
Sprites & Rendering
The Sprite is the workhorse 2D renderer: an entity with a Sprite component
draws a textured quad in the world. For solid primitives without a texture there’s
ShapeRenderer. Everything is drawn through a Camera, and
draw order is controlled by sorting layers.
Your first sprite
Section titled “Your first sprite”A sprite needs a Transform (where it is) and a Sprite (what it draws). Load a
texture through the Assets resource and put its handle on the
sprite:
import { defineSystem, Commands, Res, Query, Mut, Transform, Sprite, Assets } from 'esengine';
const spawnPlayer = defineSystem([Commands(), Res(Assets)], async (cmds, assets) => {  const tex = await assets.loadTexture('assets/textures/player.png');   // { handle, width, height }  cmds.spawn()    .insert(Transform, { position: { x: 0, y: 0, z: 0 } })    .insert(Sprite, { texture: tex.handle, size: { x: tex.width, y: tex.height } });});
sprite.texture is a texture handle, not a path — you get one from a loader
(assets.loadTexture(ref)). In the editor you don’t write this: drag an image from the
Content Browser onto an entity, or set the Sprite’s texture field in Details.
Sprite fields
Section titled “Sprite fields”| Field | Default | Description |
|---|---|---|
texture |
0 |
Texture handle from a loader (0 = untextured, draws a white quad). |
color |
{1,1,1,1} |
Tint multiplied into the texture (white = unchanged). |
size |
{100,100} |
Rendered size in world units. |
pivot |
{0.5,0.5} |
Anchor point the sprite rotates and scales about, as a fraction of its size. Values outside 0–1 sit off the sprite. |
layer |
0 |
Sorting layer — controls draw order (see below). |
flipX / flipY |
false |
Mirror horizontally / vertically. |
material |
0 |
A custom material handle (0 = the default sprite shader). |
lit |
false |
Receive 2D lights with a flat normal — the one-flag path to lit sprites (a custom material overrides it). |
uvOffset / uvScale |
{0,0} / {1,1} |
Sub-rectangle of the texture to show (for atlases / scrolling). |
tileSize / tileSpacing |
{0,0} |
Repeat the texture across the sprite (0 = no tiling). |
parallax |
{1,1} |
Parallax scroll factor (see below). |
enabled |
true |
Hide without removing the component. |
Tint & transparency
Section titled “Tint & transparency”color is an RGBA multiplier over the texture. White ({1,1,1,1}) draws it unchanged;
tint it, or fade it by lowering alpha:
sprite.color = { r: 1, g: 0.4, b: 0.4, a: 1 }; // reddenedsprite.color = { r: 1, g: 1, b: 1, a: 0.5 }; // 50% transparentcolor (and size) are animatable — key them in the
Sequencer for flashes and fades.
Size & pivot
Section titled “Size & pivot”size is the quad’s size in world units, independent of the texture’s pixel
dimensions — set it to { tex.width, tex.height } for 1:1, or anything else to scale.
Scale on the Transform multiplies on top of it. pivot is the normalized anchor
(0–1) the sprite rotates and scales about: {0.5, 0.5} is centered, {0, 0} is the
bottom-left corner, {0.5, 0} pins the bottom-center (handy for characters standing on
the ground).
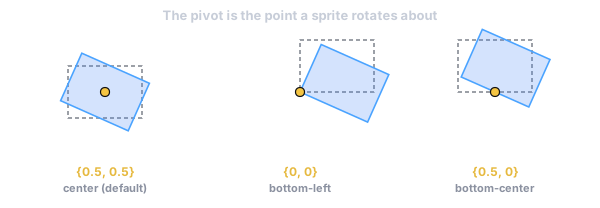
A pivot outside 0–1 is legal and useful: {0.5, -1} puts the turning point a full
sprite-height below the art, which is how you hang a swinging arm or a door off a
hinge it doesn’t contain.
Storing a fraction is what lets a pivot survive a resize, but it isn’t how anyone thinks about one — see In the editor for entering it in pixels, picking it from the nine common positions, or dragging it on the sprite itself.
Units & coordinates
Section titled “Units & coordinates”World units are design pixels. Dropping a texture into the viewport spawns a
sprite at the texture’s pixel dimensions (size = { tex.width, tex.height }), and
the editor’s cameras are authored so one world unit is one design pixel
(orthoSize = designHeight / 2). So Sprite.size is in design pixels, and pivot
is a normalized fraction of that size. The world is Y-up — positive Y is up on
screen — which is why pivot: {0, 0} is the bottom-left corner, not the top-left.
Draw order & sorting layers
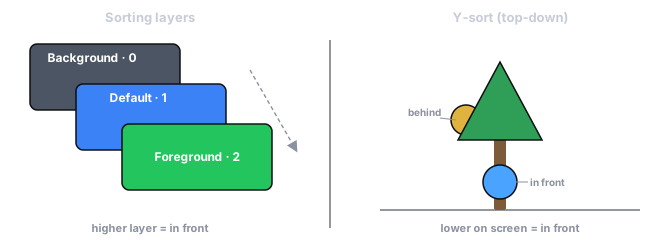
Section titled “Draw order & sorting layers”When sprites overlap, draw order decides what’s on top. Order is set by the sorting
layer (sprite.layer) — a named layer list you define in Project Settings →
Rendering, so the inspector shows a dropdown of Background, Default, Foreground,
etc. instead of a raw number. Lower layers draw first (behind).
Naming is a readability feature, not a limit: name up to thirty-two slots (a slot’s
index is its z-order). The names are suggestions — type a number the list doesn’t
offer and the field takes it, and with no names at all layer is a plain number
field. The renderer sorts on any integer either way.
sprite.layer = 0; // e.g. "Background"sprite.layer = 2; // e.g. "Foreground" — drawn on topOrder within a layer
Section titled “Order within a layer”sprite.order is where a sprite sits inside its sorting layer: higher draws on
top, the range is −128…127, and 0 says nothing at all. It outranks whatever the
layer would otherwise have inferred — z on a painter layer, world Y on a Y-sorted one:
shadow.order = -1; // under its owner, wherever the owner walksweapon.order = 1; // over the hand holding itOn a Y-sorted layer this is the only override there is, because z never reaches that key at all. Without it, keeping a shadow under its owner meant moving the sprite in Y and lying about where it stands.
Sorting groups
Section titled “Sorting groups”An order is a promise about one sprite against everything else in the layer, and that stops scaling as soon as two assembled characters overlap: raising a weapon above the other character raises it above its own body too.
SortingGroup makes an entity and its whole subtree sort as one unit. The group
states the layer and order the assembly presents outward; each member’s own
sprite.order becomes its place inside the group, and nothing outside the group can
land between two members.
world.insert(character, SortingGroup, { layer: 2, order: 5 });// Inside the character, these are now free to mean only "which part is in front".world.update(body, Sprite, (s) => { s.order = 0; });world.update(arm, Sprite, (s) => { s.order = 1; });Two characters are then ordered against each other by their groups alone, and neither one’s parts can interleave with the other’s.
Groups nest. A weapon prefab that carries its own SortingGroup, rigged under an
arm, stays one block wherever the arm goes — the outer group still owns the layer, and
the block does not come apart around a sibling of the arm.
Sprite masks
Section titled “Sprite masks”A SpriteMask turns an entity’s own sprite into a stencil: sprites drawn after it
that ask to be masked are cut by its shape. Nothing else about the sprite changes — the
texture, size, pivot, flips and 9-slice are the ones you already authored — and while it
is masking, the mask’s sprite is not drawn. It is the cut, not a picture.
world.insert(hole, SpriteMask, { alphaCutoff: 0.5 });world.update(fog, Sprite, (s) => { s.maskInteraction = SpriteMaskInteraction.VisibleOutside; // a hole in the fog});Masking is opt-in per sprite (Sprite.maskInteraction), so adding a mask to a scene
can never make an unrelated sprite vanish:
maskInteraction |
What survives |
|---|---|
None (default) |
The mask is ignored. |
VisibleInside |
Only the part over the mask — a window. |
VisibleOutside |
Only the part away from it — a hole. |
alphaCutoff above 0 cuts to the sprite’s shape rather than its box: fragments below
that alpha do not mask, so a round mask cuts a circle.
A mask reaches forward — it cuts what is drawn after it, in the order you already
arrange by layer and order. That is the order its stencil is written in, so a sprite at
the same layer and order as the mask is not cut at all. Turn on limitRange to stop
the reach at a stated layer and order.
A mask cuts the picture, not the scene: picking, physics and queries do not see it.
Scene order breaks the tie
Section titled “Scene order breaks the tie”Same layer, same z? Then scene order decides: the engine draws entities in the order the scene lists them, so the one further down the Outliner lands on top. Dragging a row in the Outliner therefore changes what covers what — and the viewport updates as you drop it, exactly as the running game will draw it. A dragged parent takes its children along, so a child always keeps its position relative to its parent.
At runtime the same order is available without touching layers — useful for “bring this card to the front”:
// Draw `card` last (on top) among these three, leaving everything else alone.world.applyEntityOrder([other, another, card]);Y-sort (top-down occlusion)
Section titled “Y-sort (top-down occlusion)”For top-down games, check a layer under Project Settings → Rendering → Y-sorted
layers and every sprite, shape, and text on that layer draws in world-Y order:
entities lower on screen draw on top, so a character walking below a tree appears in
front of it — no manual layer or z juggling.
Depth layers (2.5D)
Section titled “Depth layers (2.5D)”Check a layer under Project Settings → Rendering → Depth-sorted layers and it
stops using paint order entirely: what covers what is decided by the depth buffer,
from each entity’s Transform z. With a perspective camera that is 2.5D — sprites
at different depths occlude each other correctly from any angle, with no sort order
to maintain by hand.
Which sprites take part is decided by their material’s blend mode, because that is what says whether a draw reads what is already on screen:
| Blend mode | In a depth layer |
|---|---|
None (opaque) |
Writes depth and is occluded by anything nearer, whatever order it was drawn in. |
| Anything else (translucent) | Tests against depth but never writes it, and stays in back-to-front paint order. |
That split is not a setting — a translucent sprite that wrote depth would clip the sprites behind it into hard black edges. So a sprite you want to occlude properly needs an opaque material; leave the blend mode alone and it behaves as it always has, just with things in front of it hiding it.
To look at any of this while authoring, switch the viewport’s 2D / 3D button (scene toolbar) — the editor’s own eye becomes a perspective one. It changes only your view: the Game view always shows the scene’s camera. Picking and dragging follow, so a sprite at z = -400 is grabbable where it is drawn.
Flipping, atlases & scrolling
Section titled “Flipping, atlases & scrolling”- Flip a sprite with
flipX/flipY— e.g. face a character left or right without a separate texture. - Atlases: show one cell of a packed sheet by setting
uvOffsetanduvScaleto the cell’s normalized rectangle. (For frame-by-frame animation, drive these from the Animator instead of by hand.) - Scrolling: animate
uvOffsetover time to scroll a texture (water, conveyor belts), and settileSizeto repeat it across a large sprite.
Texture filtering & wrapping
Section titled “Texture filtering & wrapping”How a texture is sampled is set per texture handle, not per sprite:
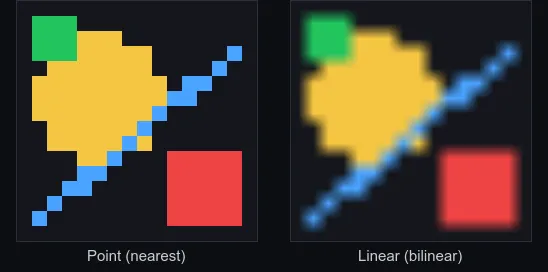
The same tiny texture magnified ~15×. Nearest keeps texel edges hard (pixel art); Linear interpolates between texels for a smooth look (the default).
| Enum | Values | Meaning |
|---|---|---|
TextureFilter |
Nearest, Linear |
Nearest = hard texel edges (pixel art); Linear = smooth interpolation (default). |
TextureWrap |
Repeat, ClampToEdge, MirroredRepeat |
What UVs outside 0–1 sample — tiling repeats, clamp stretches the edge pixel. |
import { TextureFilter, TextureWrap, setTextureFilter, setTextureWrap, setTextureParams } from 'esengine';
setTextureFilter(tex.handle, TextureFilter.Nearest);   // crisp pixel artsetTextureWrap(tex.handle, TextureWrap.Repeat);        // tile outside 0–1 UVs
// The two helpers above each reset the *other* params to their defaults// (ClampToEdge / Linear). To set filter and wrap together, use the full form:setTextureParams(tex.handle, TextureFilter.Nearest, TextureFilter.Nearest,                 TextureWrap.Repeat, TextureWrap.Repeat);
setTextureParams(textureId, minFilter, magFilter, wrapS, wrapT) is the complete
surface — separate minification/magnification filters and per-axis wrap. Repeat
is what makes tileSize tiling and UV-scroll effects seamless.
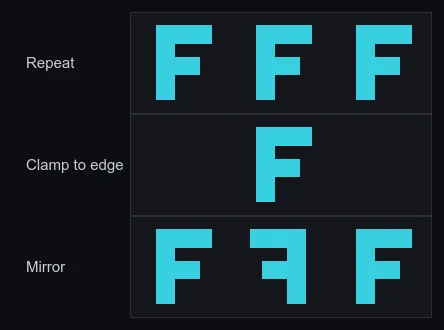
What each wrap mode does with UVs outside the 0–1 range (centre tile = the texture): Repeat tiles it, Clamp to edge stretches the border pixel, and Mirror flips every other copy.
Parallax backgrounds
Section titled “Parallax backgrounds”parallax scales how much a sprite moves relative to the camera: 1 moves with the
world, 0 locks it to the camera (a fixed backdrop), and values in between scroll
slower for depth. Layer a few sprites at 0.2, 0.5, 0.8 for a classic parallax
background.
Custom materials & lighting
Section titled “Custom materials & lighting”Assign sprite.material to draw the sprite with your own shader — a tint, a
dissolve, a distortion — see Materials & Shaders.
To make a sprite respond to Light lights, the simplest path is to set
sprite.lit = true — no custom material needed (it’s lit with a flat normal). For
normal maps or a fully custom look, use a Lit-2D material instead. Either way,
see 2D Lighting & Shadows.
Sprite filters (outline, glow, drop shadow)
Section titled “Sprite filters (outline, glow, drop shadow)”For the most common per-sprite effects you don’t need to write a shader —
SpriteFilter builds a ready-made material you assign to sprite.material:
import { SpriteFilter } from 'esengine';
sprite.material = SpriteFilter.createOutline({ color: { r: 1, g: 1, b: 1, a: 1 }, width: 2 });sprite.material = SpriteFilter.createGlow();                        // warm outline presetsprite.material = SpriteFilter.createDropShadow({ offsetX: 3, offsetY: 3, blur: 2 });
Tweak a live filter with setOutlineColor / setOutlineWidth /
setShadowOffset / setShadowBlur (selection pulses, hit flashes). Each call
creates a material — share one handle across sprites that use the same look, and
pass texelSize: { x: 1/texWidth, y: 1/texHeight } for exact pixel widths on
textures that aren’t 512×512.
Shapes without a texture
Section titled “Shapes without a texture”For solid circles, capsules, and rounded rectangles — placeholders, bars, debug
overlays — use ShapeRenderer instead of a texture (ShapeType.Circle,
Capsule, or RoundedRect):
import { ShapeRenderer, ShapeType } from 'esengine';
cmds.spawn()  .insert(Transform, { position: { x: 0, y: 0, z: 0 } })  .insert(ShapeRenderer, {    shapeType: ShapeType.RoundedRect,    size: { x: 200, y: 80 },    cornerRadius: 12,    color: { r: 0.2, g: 0.6, b: 1, a: 1 },  });
ShapeRenderer shares the sorting layer and color conventions with Sprite.
Motion trails
Section titled “Motion trails”TrailRenderer draws a world-space ribbon along an entity’s recent path —
sword swipes, dashes, projectile streaks. Add the component and move the entity;
the engine records the position history and renders the taper for you:
cmds.spawn() .insert(Transform, { position: { x: 0, y: 0, z: 0 } }) .insert(TrailRenderer, { time: 0.4, startWidth: 24, blendMode: 1 }); // additive glow| Field | Default | Description |
|---|---|---|
time |
0.5 |
Seconds each trail point lives before fading out of the tail. |
minVertexDistance |
5 |
Min world distance moved before a new point is recorded (0 = every frame). |
emitting |
true |
false freezes emission — the streak detaches and fades in place. |
startWidth / endWidth |
20 / 0 |
Ribbon width at the head / tail (0 tapers to a line). |
startColor / endColor |
white / white α 0 | Color lerped head → tail; tail alpha 0 is the fade-out. |
texture |
0 |
Texture along the ribbon (U runs head→tail); 0 = vertex colors only. |
blendMode |
0 |
0 Normal, 1 Additive (glow), 2 Multiply. |
layer / material |
0 / 0 |
The usual sorting layer / custom material. |
The Trail resource (Res(Trail)) adds clear(entity) to drop an entity’s
history instantly — e.g. when teleporting, so the trail doesn’t streak across the
map.
Bitmap text in the world
Section titled “Bitmap text in the world”BitmapText renders world-space text from a prebaked bitmap font — damage
numbers, name tags, retro UI. Point font at a BMFont asset (.fnt text or
.bmfont JSON) and set text:
| Field | Default | Description |
|---|---|---|
text |
'' |
The string to draw. |
font |
0 |
The bitmap-font asset (.fnt / .bmfont). |
fontSize |
1 |
Scale over the font’s authored size. |
align |
Left |
Left / Center / Right. |
spacing |
0 |
Extra per-character spacing. |
color |
{1,1,1,1} |
Tint — animatable (flash a damage number). |
layer / parallax |
0 / {1,1} |
Same sorting layer / parallax semantics as Sprite. |
For screen-space UI text (layout, wrapping, SDF sharpness), use the UI Text
widget instead — see UI.
Hit-testing sprites
Section titled “Hit-testing sprites”“Did the click land on this sprite?” is two steps: convert the screen point to
world space, then test it against the sprite’s rectangle. The CameraView
resource does the first (see Camera); for the second the
SDK exports pivot-aware point tests:
| Function | Tests |
|---|---|
pointInWorldRect(px, py, worldX, worldY, worldW, worldH, pivotX, pivotY) |
An axis-aligned rectangle placed by position + pivot (a sprite’s exact footprint when unrotated). |
pointInOBB(…, rotationZ, rotationW) |
The same rectangle rotated — pass the transform quaternion’s z/w; falls back to the rect test when unrotated. |
pointInHitArea(px, py, area) |
A custom HitAreaShape — rect, circle, or polygon. |
import { defineSystem, Query, Res, CameraView, Input, Transform, Sprite, pointInOBB } from 'esengine';
const clickSprites = defineSystem(  [Query(Transform, Sprite), Res(CameraView), Res(Input)],  (q, view, input) => {    if (!input.isMouseButtonPressed(0)) return;    const p = view.screenToWorld(input.mouseX, input.mouseY);    if (!p) return;    for (const [entity, t, s] of q) {      const w = s.size.x * t.worldScale.x, h = s.size.y * t.worldScale.y;      if (pointInOBB(p.x, p.y, t.worldPosition.x, t.worldPosition.y,                     w, h, s.pivot.x, s.pivot.y,                     t.worldRotation.z, t.worldRotation.w)) {        console.log('hit', entity);      }    }  });
For sprites whose clickable region isn’t their rectangle — an irregular character,
a donut-shaped button — describe the region as a HitAreaShape in sprite-local
coordinates and test the localized point:
import { pointInHitArea, type HitAreaShape } from 'esengine';
const hull: HitAreaShape = { type: 'polygon', points: [0, 0, 64, 0, 64, 48, 32, 64, 0, 48] };// For an unrotated sprite, localize by subtracting its origin:const hit = pointInHitArea(p.x - t.worldPosition.x, p.y - t.worldPosition.y, hull);
screenToWorld is also exported standalone (it takes an inverse view-projection
matrix and a viewport rectangle) for code that manages its own camera math — the
CameraView resource is the same function with the active camera filled in. For
interactive UI, don’t hand-roll any of this: Interactable + UIEvents do
picking for you (see UI).
In the editor
Section titled “In the editor”- Create → Sprite adds a sprite entity, or drag an image from the Content Browser into the viewport to spawn one already textured.
- Every field above is editable in Details; sprites, cameras, and lights show as gizmos in the viewport. See The Editor.
pivotis authored three ways, all writing the same stored fraction:- The 3×3 grid under the field picks the nine common positions in one click.
- The
frac/pxswitch on the row enters it in pixels instead —pxshowspivot × size, and typing32stores32 / size. The unit is a view; the scene always holds the fraction. - With the pointer tool, a single selected sprite gets a pivot dot in the viewport. Dragging it moves the pivot through the artwork without moving the artwork — the transform takes up the slack — so you can put the turning point on a foot or a hinge by eye. It hides under Move/Rotate/Scale, whose centre grab sits in the same place.
See also
Section titled “See also”- Textures — the image itself: formats, import settings, and how to read its width and height.
- Animation — sprite-sheet flipbooks and tweened properties.
- Custom Drawing — meshes and immediate-mode shapes beyond sprites.
- 2D Lighting & Shadows — normal maps and per-sprite lighting.