
2D Lighting & Shadows
Estella lights 2D scenes with Light sources and ShadowCaster2D occluders.
A light is just an entity with a Light component; a renderer receives light only
when it’s drawn with a Lit-2D material. This keeps lighting opt-in and cheap — most
sprites stay unlit, and the ones you want lit get a lit material.
Adding a light
Section titled “Adding a light”Give an entity a Light component and pick a type:
import { defineSystem, Commands, Transform, Light, LightType, lightAimRotation } from 'esengine';
const addSun = defineSystem([Commands()], (cmds) => {  cmds.spawn()    // A light aims along its entity's forward, so the sun is aimed by turning it.    .insert(Transform, {      position: { x: 0, y: 0, z: 0 },      rotation: lightAimRotation({ x: -1, y: -1, z: -1 }),    })    .insert(Light, {      type: LightType.Directional,      color: { r: 1, g: 0.95, b: 0.8, a: 1 },      intensity: 1.2,    });});
Light fields (with defaults):
| Field | Default | Description |
|---|---|---|
type |
Point |
LightType: Point, Directional, Ambient, or Spot. |
color |
{1,1,1,1} |
Light color, RGBA 0..1. |
intensity |
1 |
Brightness multiplier. |
radius |
200 |
Falloff reach in world units (Point / Spot). |
innerRadius |
0 |
Radius held at full strength before the falloff starts (Point / Spot). |
falloff |
1 |
Falloff shape: 1 is linear, higher pools near the light, lower reaches further. |
shadowStrength |
1 |
How much of this light its shadows remove; 0.6 leaves a shadow that is dark rather than black. |
cookie |
— | A texture whose alpha is this light’s shape (Point / Spot). |
cookieSize |
{0,0} |
How big the cookie is drawn, in world units; 0 covers the light’s own reach. |
innerAngle |
30 |
Spot cone inner angle, degrees (full brightness inside). |
outerAngle |
45 |
Spot cone outer angle, degrees (falls to zero by here). |
shadowSoftness |
0 |
Shadow edge softness (light-source size); 0 = hard edge. |
shadowDistance |
0 |
Directional shadow reach; 0 = no directional shadow. |
enabled |
true |
Turn the light off without removing it. |
Light types
Section titled “Light types”| Type | Behavior |
|---|---|
| Directional | A uniform light along the entity’s forward, like the sun — position doesn’t matter, only the rotation. |
| Point | Radiates from the entity’s position and falls off to nothing at radius. |
| Spot | A cone from the position along the entity’s forward, full-bright within innerAngle and fading to the edge at outerAngle, out to radius. |
| Ambient | A flat base light added everywhere, regardless of position — use a low intensity so shaded areas aren’t pure black. |
// A warm point light.insert(Light, { type: LightType.Point, radius: 320, intensity: 1.5,                   color: { r: 1, g: 0.7, b: 0.3, a: 1 } });
// A flashlight cone, aimed down the screen by the entity it sits on.insert(Transform, { rotation: lightAimRotation({ x: 0, y: -1, z: 0 }) }).insert(Light, { type: LightType.Spot,                   innerAngle: 18, outerAngle: 34, radius: 500, intensity: 2 });
// A dim ambient fill so nothing is fully black.insert(Light, { type: LightType.Ambient, intensity: 0.25 });
Shaping the falloff
Section titled “Shaping the falloff”A Point or Spot light fades from its own centre to nothing at radius, in a straight
line. Two fields bend that line, and neither moves where the light ends:
innerRadiusholds the light at full strength out to a radius of its own, and the fade happens in the band that is left. A lamp with a bright core isinnerRadiusmost of the way toradius; a light with none is the straight line it always was.falloffis the power the remaining ramp is raised to.1is linear. Above it the light pools near its source and the outer reach dims quickly — closer to how light actually behaves. Below it the light stays bright most of the way out and then ends, which is the look a stylised 2D scene often wants.
// A lantern: a bright core, then a quick fade.entity.insert(Light, { type: LightType.Point, radius: 400, innerRadius: 120, falloff: 2.5, intensity: 1.4,});Both default to the straight line, so a scene written before them renders exactly as it did.
Giving a light a shape
Section titled “Giving a light a shape”A light is a circle, or a cone. Real ones are neither: a lantern throws a ragged glow, a
window throws a shaft, a torch flickers in a shape a falloff curve cannot describe. Hand
a light a cookie — a texture whose alpha is the shape — and that is what it lights.
entity.insert(Light, { type: LightType.Point, radius: 300, intensity: 1.6, cookie: 'assets/textures/lantern-glow.png',});- The alpha is the shape. The cookie’s colour is not read: a light’s colour is the light’s, and two places to set it is one too many.
- It is drawn where the light is, turned by the entity’s rotation and sized by
cookieSize— or, when that is zero, covering the light’s own reach. - It multiplies the falloff rather than replacing it, so a shaped light still fades
out at
radiusand still respectsinnerRadiusandfalloff. - Four shaped lights fit a frame. Past that a light lights the scene without a shape, the same way a fifth shadow-caster keeps lighting without casting.
The shape is drawn into a screen-space mask, one channel per shaped light — the same machine the 2D shadows use, which is why a cookie costs one quad rather than a texture slot per light.
Making a renderer receive light
Section titled “Making a renderer receive light”By default a Sprite draws with an unlit material and ignores every light. The
simplest way to light one is the lit flag — no material, no shader:
app.world.spawn() .insert(Transform, { position: { x: 0, y: 0, z: 0 } }) .insert(Sprite, { texture: hero, lit: true });In the editor this is the Lit checkbox on the Sprite component. The sprite is lit with a flat normal — every 2D light type, falloff, and shadow works out of the box.
When you need more than the flag (a tint parameter, a normal map, custom surface logic), use a material whose shader declares the Lit-2D domain. The engine injects the lighting uniforms and helpers, and the vertex stage is optional for 2D shaders — you write only the fragment:
#pragma shader "MyLit"#pragma version 300 es#pragma domain Lit
#pragma fragmentprecision mediump float;in vec4 v_color;in vec2 v_texCoord;in highp vec2 v_worldPos;uniform sampler2D u_textures[8];out vec4 fragColor;
// #pragma domain Lit makes the engine inject the LightConstants block and the// applyLighting2D() helper — you just call it with your base color and a normal.void main() {  vec4 base = texture(u_textures[0], v_texCoord) * v_color;  vec3 N = vec3(0.0, 0.0, 1.0);                 // flat normal, facing the camera  vec3 lit = applyLighting2D(base.rgb, N, v_worldPos);  fragColor = vec4(lit, base.a);}#pragma end
In the editor, New Material (Lit) in the Content Browser creates exactly this — a ready lit material with a tint and an optional normal map. From code, compile and assign it as in Materials & Shaders:
import { Material, defineSystem, Query, Mut, Sprite } from 'esengine';
const litMat = Material.create({ shader: Material.compileShader(myLitSource) });
const applyLit = defineSystem([Query(Mut(Sprite))], (q) => {  for (const [, sprite] of q) sprite.material = litMat;});
You can also build a lit material visually — set the Material Graph’s domain to
Lit — see the material graph section.
Normal maps
Section titled “Normal maps”The N you pass to applyLighting2D is the surface normal. Passing a constant
vec3(0, 0, 1) gives flat, evenly-lit surfaces. For per-pixel relief, sample a
normal map in the shader and use that as N instead — the same base color then
catches highlights and shadow from each light’s direction. Add the normal texture as a
#pragma param … texture on your lit material (see Materials & Shaders).
Metal, roughness and highlights
Section titled “Metal, roughness and highlights”applyLighting2D is the shorthand for a surface that reflects nothing. The general
form takes the same lights through a microfacet BRDF, and a Lit-2D shader can call
it directly:
highp vec3 P = vec3(v_worldPos, 0.0);highp vec3 lit = applyLightingPBR( base.rgb, // albedo N, // surface normal P, // world position viewDirection(P), // toward the camera, from the frame block u_metallic, // 0 = dielectric, 1 = metal u_roughness, // 0 = mirror, 1 = fully diffuse u_specular, // glTF's specularFactor: 0 removes the highlight 1.0 // ambient occlusion);applyLighting2D(albedo, N, worldPos) is exactly this call with metallic = 0,
roughness = 1 and specular = 0 — so a lit sprite keeps drawing the pixels it
always did, and a surface that wants a highlight asks for one.
viewDirection(worldPos) answers with the unit vector pointing at the camera; it
reads the eye position the engine puts in the frame block each frame, so an
orthographic camera returns a constant and a perspective one varies per pixel.
A metal has no diffuse term at all — it only reflects. What it reflects is the
scene’s ambient light, treated as an environment arriving equally from every
direction, so an Ambient Light is what keeps a metal from being black
everywhere no light happens to point. Raise its color to give metals something to
show.
An environment with content
Section titled “An environment with content”A flat ambient is an environment with no detail — every direction the same colour.
Import an equirectangular .hdr panorama and the same light becomes one that has
detail: sky above, ground below, whatever the file holds.
| How | What happens |
|---|---|
Drag a .hdr onto the Content Browser |
The source is copied in and baked. |
| Put one in the project folder | The editor notices and bakes it. |
estella import-hdr <file> [outDir] |
The same bake, on the command line. --face-size <n> sets the sharpest reflection. |
The bake writes two products beside the source: <name>.esenv, which holds the
whole diffuse half as nine numbers — no texture at all — and <name>_env.png,
a prefiltered reflection with one mip per roughness.
Point an Ambient light at the .esenv and both halves arrive: a surface takes
its fill light from the direction it faces, and a metal reflects the panorama
rather than one flat colour.
cmds.spawn().insert(Light, { type: LightType.Ambient, environment: 'assets/sky.esenv', intensity: 1,});color and intensity still scale it, so an environment is tinted and dimmed the
way the flat term is. A light with no environment stays exactly what it was: the
coefficients are zero, and the same expression is the flat term again.
Shadows between meshes
Section titled “Shadows between meshes”A ShadowCaster2D box (below) shadows in the XY plane, which is what a 2D scene means
by a shadow. Geometry with height needs the other kind: turn on meshShadows on a
Directional light and the frame renders the scene’s meshes once from that light, so a
mesh standing above another darkens it.
cmds.spawn() .insert(Transform, { rotation: lightAimRotation({ x: 0.5, y: 0, z: -1 }) }) // where the rays lean .insert(Light, { type: LightType.Directional, meshShadows: true, });- One light per frame casts a map — the first that asks for one.
- Only
MeshRenderergeometry the GPU holds casts and receives. Sprites are lit by the same light but shadow throughShadowCaster2D, which is the 2D answer. - Coverage follows the camera.
shadowExtentfixes it to a radius instead, trading sharpness for reach.
Casting shadows
Section titled “Casting shadows”Add a ShadowCaster2D to an entity to make it block light and cast a shadow:
import { ShadowCaster2D } from 'esengine';
cmds.spawn()  .insert(Transform, { position: { x: 100, y: 0, z: 0 } })  .insert(Sprite, { /* … a lit material … */ })  .insert(ShadowCaster2D, { size: { x: 64, y: 64 } });
ShadowCaster2D field |
Default | Description |
|---|---|---|
size |
{32,32} |
The occluder’s size in world units. |
enabled |
true |
Toggle shadow casting. |
Shadow quality is controlled on the light, not the caster:
shadowSoftness— the light-source size.0is a crisp hard edge; larger values give a soft penumbra (a bigger, closer light casts softer shadows).shadowDistance— for a Directional light, how far its shadows extend;0leaves a directional light shadow-free.shadowStrength— how much of the light a shadow takes away,0..1. A 2D scene usually wants less than all of it: real shade is lit by everything that bounced, and1is the only value that cannot be.
How many, and what it costs
Section titled “How many, and what it costs”Shadows are drawn, not solved per pixel: each frame the engine takes the edges of every enabled caster, draws what they hide from each casting light into a screen-sized mask, and a lit surface reads one texel of it. So the number of occluders is a number of triangles rather than a shader constant — a room may have as many walls as it needs, and adding one costs a few triangles rather than a test on every pixel of the screen.
What IS capped is how many lights cast at once: the mask has four channels, so the
first four casting lights get one each. A light past that still lights the scene and
stops shadowing — the room stays lit, and what is missing is a shadow rather than the
light. A scene with more than four shadow-casting lights in view at once is usually
saying something about its art direction; the fix is to turn shadows off (shadowDistance
of 0 on a sun, or a smaller radius that takes a light out of view) on the ones whose
shadows nobody looks at.
Baked light
Section titled “Baked light”Sixteen lights reach one frame. The seventeenth is dropped — by brightness, with a warning naming what was refused — and that ceiling is not a quality setting: a room with thirty lamps in it cannot be lit in real time here at all.
A bake is the way past it. Light that never moves is computed once, offline, and stored as a texture; at run time the surface reads a texel instead of summing lights. A hundred lamps then cost exactly what one costs, and what they cost is a sample.
The engine reads a bake through two things, and you give it both:
- A mesh with a second UV set. The first UV set is how the art is wrapped, and it
overlaps on purpose — two arms share the texels of one arm. A bake cannot: each
surface needs its own patch, or one wall’s light lands on another. Both importers
carry the channel through when a model has one (
TEXCOORD_1in glTF, a second UV layer in FBX), so this is a question for whoever authored the model. - A
MeshLightmapcomponent.lightmapis the atlas, andscaleOffsetis the rectangle of it this object occupies —xyscales the second UV set,zwoffsets it.(1, 1, 0, 0)reads the whole texture, which is what a bake of a single object produces. The rectangle is per entity and not per mesh, because the same mesh placed twice is lit twice, differently.
What the bake MEANS depends on the renderer’s lit flag, and the two are worth
telling apart:
lit |
With a MeshLightmap |
Without |
|---|---|---|
| on | Real-time light plus the bake, which carries the indirect term | Real-time light only |
| off | The bake is all of the surface’s light | Unlit — the texture as authored |
The second row is the one a bake is for. A scene whose lights all went into the atlas
draws with lit off and pays for no lights at all — on a phone, that is the difference
between a lit room and a slideshow.
An object whose geometry carries the channel but has no MeshLightmap draws exactly as
it did before: the rectangle is zero, and the shader reads that as “no bake” rather than
as an atlas of black.
The editor bakes one: Lighting → Bake Lighting writes the atlas beside the scene
and fills in every MeshLightmap, and node pipeline/bin/estella.mjs bake-scene <scene> does the same thing from the command line. A bake authored elsewhere
(Blender’s Cycles, a Substance bake, any renderer that writes a lightmap and its UV
layout) is still read exactly as well — the component is the contract, not the baker.
What a shiny surface reflects indoors
Section titled “What a shiny surface reflects indoors”A lightmap is the diffuse half. The other half is what a mirror shows, and without a probe that is always the sky — indoors, a chrome ball reflects the clouds through the ceiling.
ReflectionProbe is the answer, and it is the same shape as LightProbeVolume: a box,
filled by the same bake.
world.insert(room, ReflectionProbe, { halfExtents: { x: 400, y: 220, z: 400 } });The baker captures the sphere seen from the probe’s position, prefilters it for every
roughness, and writes every probe of the scene into ONE atlas beside the lightmap —
reflection names it and slot says which column is this one’s. Both fields are the
baker’s to write; what you place is the box.
Three things worth knowing:
- The reflection is projected onto the box, so it slides across a wall as the eye moves instead of being painted on. Size the box to the room, not to the object.
- Where two boxes overlap the smaller wins — a cupboard inside a hall reflects what the cupboard was baked to say.
- Do not put a probe inside a shiny object. The capture is taken from that point; standing inside the ball, all it sees is the inside of the ball.
Skinned meshes take no bake: bones move a character, and a bake cannot hold one still long enough to light it. A character in a baked room is lit in real time, by the lights that stayed behind.
Linear color space
Section titled “Linear color space”By default the engine renders gamma-space — colors blend as-authored, the way 2D pipelines classically have. A project can switch to the linear-light pipeline: textures decode from sRGB to linear on sample (in hardware), lights and tints blend in linear light, and the finished frame encodes back to sRGB in the final blit.
Physically-correct blending changes how light accumulates: falloffs stop crushing to black, and overlapping lights add like light instead of paint. Unlit art round-trips unchanged — decode followed by encode is an identity — so switching does not repaint your sprites; the difference shows wherever colors mix.
Linear mode is also the door to HDR: where float render targets are available
(WebGPU always; WebGL2 with EXT_color_buffer_float), the post-process chain runs in
half-float, so a light with intensity above 1 pushes real over-range energy into
bloom and tonemap — bright lights glow.
Enable it in Project Settings → Rendering → Color space → Linear. Shaders compile against the mode, so it is fixed at engine boot — the editor prompts for a reload. The setting rides the project manifest: the viewport, Play, and every export — web, desktop, WeChat, playable — boot the same pipeline. Code-first projects pass it at app creation:
const app = createWebApp(module, { colorSpace: 'linear' });In the editor
Section titled “In the editor”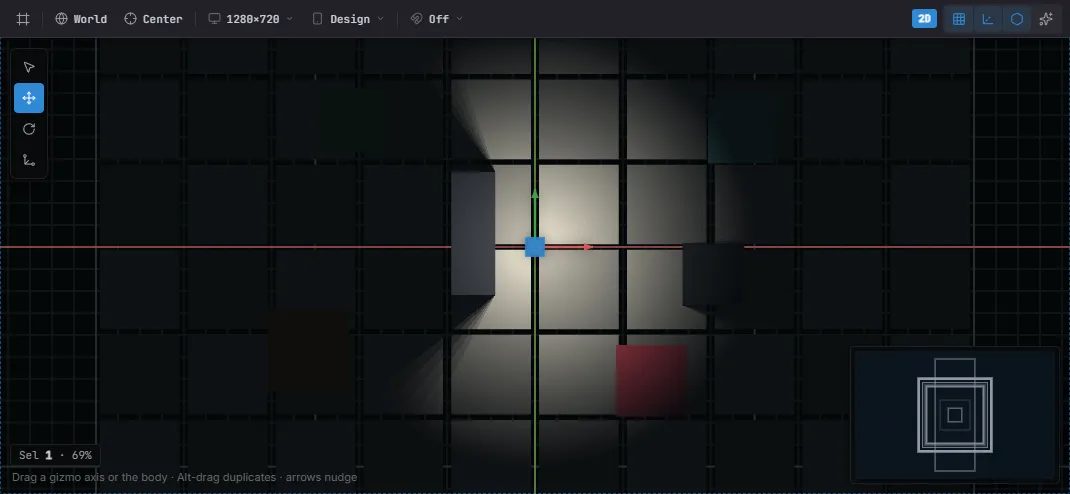
A Light previewed in the editor — its reach pool and the shadows the pillars cast (turn on Preview FX to light the scene in edit mode).
- Add a light via Create… → Light, or add a
Lightcomponent to an existing entity in the Details panel. - Lights are drawn as gizmos in edit mode — an icon plus the reach circle and the direction / cone — so you can aim and size them by eye. See The Editor.
- Tune
color(a color picker),intensity,radius, and the spot angles live in Details; the results update in the viewport immediately. - All of a light’s visual fields (
color,intensity,radius, the angles, and the shadow settings) are animatable — key them in the Sequencer for flickering torches, day/night cycles, or a pulsing beacon.
See also
Section titled “See also”- Materials & Shaders — lit materials and custom shading.
- Post-processing — bloom and color grading over the lit scene.
- Sprites & Rendering — normal maps that give 2D sprites depth under light.