The Editor
The Estella editor is a desktop application (Electron + React) with a UE5-style dockable workspace. You build scenes visually, tune components in an inspector, paint tilemaps, wire node graphs, and play the game right inside the editor — in an isolated runtime realm, so play never dirties your scene.
Launching a project
Section titled “Launching a project”When no project is open, the editor shows the Launcher:
- Recent — reopen a project you’ve worked on, with search and grid/list views.
- New project — pick a template, give it a name and location, and create it. Templates come in two groups: Starters (the Blank template — an empty scene with a camera) and Examples (the bundled sample projects, ready to explore and edit).
A project is a folder on disk. The pieces the editor cares about:
| Path | What it is |
|---|---|
project.esproject |
The project manifest — name, default scene, design resolution, enabled features (physics, rendering), packaging. Committed to version control. |
.esengine/workspace.json |
Editor-local state (last-opened scene, panel layout). Gitignored. |
assets/scenes/*.esscene |
Your scenes. |
assets/… |
Textures, materials, tilesets, and other assets, each with a .meta sidecar. |
src/components.ts |
Where you declare your project’s components and behaviors. |
src/main.ts |
The startup entry — where you register systems. |
Assets are referenced portably by UUID (@uuid:…) rather than by path, so moving or
renaming a file doesn’t break references.
The workspace
Section titled “The workspace”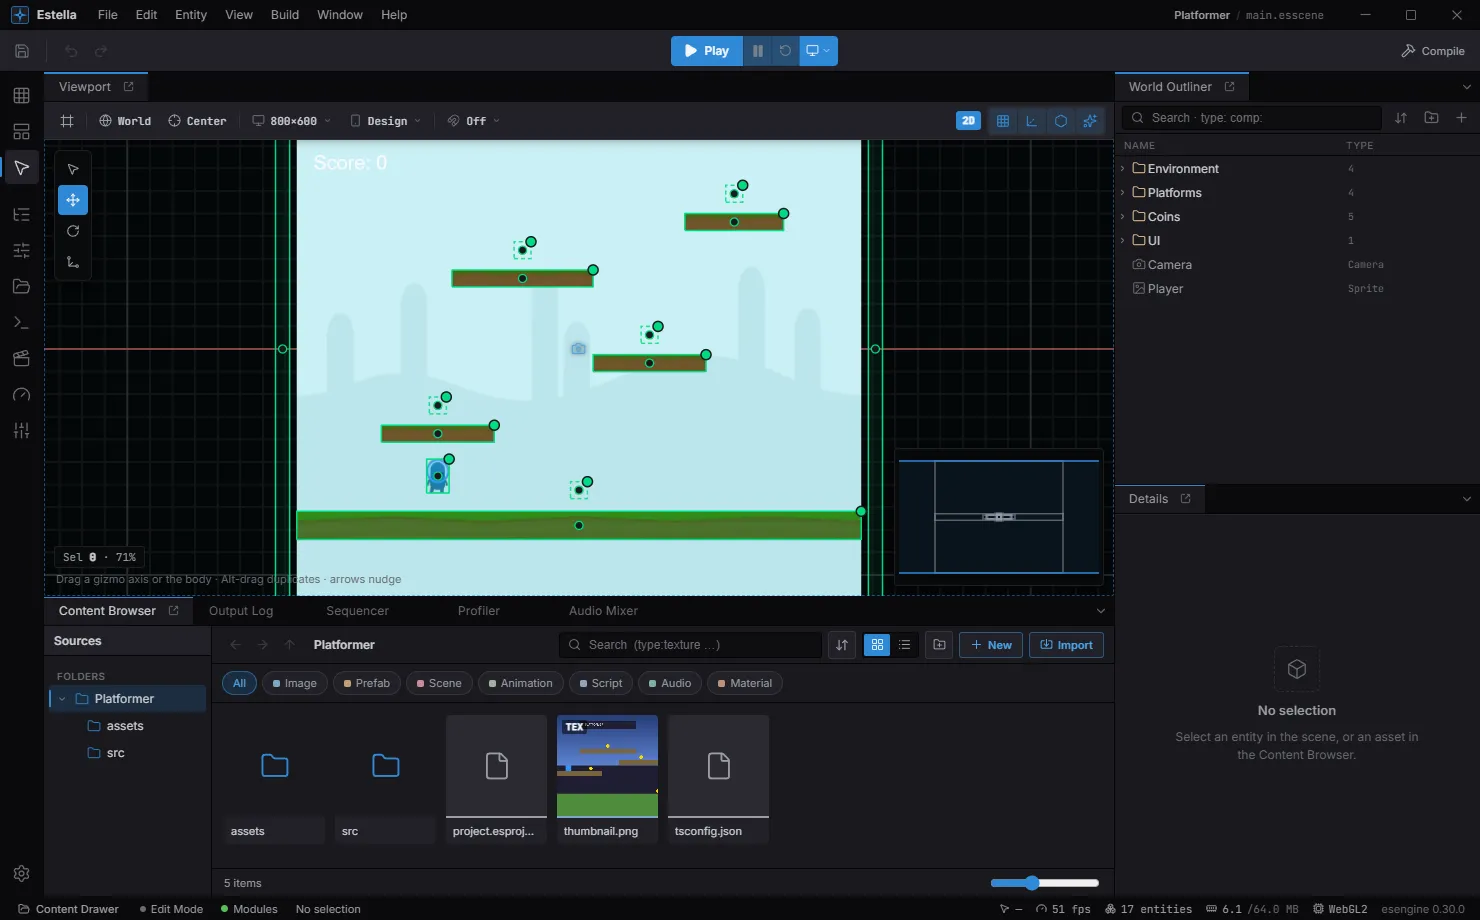
The default workspace: the viewport in the centre, the World Outliner and Details on the right, the Content Browser along the bottom, and the Play controls up top.
The default layout, from the outside in:
- Activity Bar — the far-left icon rail: the editing mode (Scene / UI / Tilemap), side panels, and project settings.
- Menu Bar — File · Edit · Entity · View · Build · Window · Help.
- Toolbar — Save, Undo/Redo, the transform tools, snapping, Show Grid, the Play controls, Show Gizmos, and Build.
- Viewport (center) — the live WebGL scene view.
- World Outliner (right) — the scene’s entity hierarchy.
- Details (right) — the inspector for the current selection.
- Content Browser + Output Log (bottom tabs).
- Status Bar — edit mode, selection, cursor, FPS, draw calls, and the engine version.
Panels are dockable — drag a tab to re-arrange, split, or float it, and the layout is saved automatically. You can also summon the Content Browser as a slide-up overlay from anywhere with Ctrl / ⌘ + Space (the Content Drawer).
The viewport
Section titled “The viewport”The viewport is where you place and manipulate entities.
Navigation
- Pan — drag with the middle or right mouse button.
- Zoom — scroll the mouse wheel (zooms toward the cursor).
- Frame Selected — press F to center and fit the selection.
Selecting
- Click an entity to select it; Shift-click to toggle it in a multi-selection.
- Drag on empty space to marquee box-select everything inside.
- Press Esc to cancel an in-progress drag, then to clear the selection.
Transforming — pick a tool from the toolbar (or its shortcut) and drag a gizmo handle:
| Tool | Shortcut | Gizmo |
|---|---|---|
| Select | Q |
Pick / marquee only, no transform handles. |
| Move | W |
Axis arrows (X / Y) plus a center plane for free move. |
| Rotate | E |
A rotation ring. |
| Scale | R |
Axis boxes plus a uniform-scale center. |
Dragging a handle transforms the whole selection as one, about a shared pivot, and each drag is a single undo step. Alt-drag a selection to duplicate it and drag the copies. Nudge the selection with the arrow keys (one grid step; hold Shift for ×10).
Align & distribute — select two or more entities and a strip of alignment buttons appears in the viewport overlay: align left / centre / right edges and top / middle / bottom edges. With three or more selected, two distribute buttons even out horizontal or vertical spacing. Each is a single undo step and works across every entity kind (sprites, UI nodes, gizmo-only entities alike).
Snapping — toggle snapping from the viewport’s Snap dropdown and set the grid step, rotation angle, and scale increment.
Show Flags — a viewport dropdown toggles the Grid, Gizmos, Physics, and the perf
overlay, plus World/Local axis orientation and Pivot-vs-Center. Entities that don’t
render — Cameras, Light2D, colliders, joints, particle emitters — are drawn as
gizmos in edit mode (icon, view rect, light reach/cone, collider outline, joint
anchor links) so you can see and place them; many carry drag handles that write
their fields directly (light radius, collider size, emitter shape, joint anchors).
Editing modes
Section titled “Editing modes”The Activity Bar’s top three icons switch the editing mode — Scene, UI, or
Tilemap. The mode also follows your selection: pick a Canvas or UINode and the
editor suggests UI mode, a TilemapLayer suggests Tilemap — switching that mode’s
tools and viewport aids without disturbing your panel layout. To open a mode’s
companion panels (UI Widgets, the Tilemap painter), click its Activity Bar icon or the
viewport’s mode chip; that also pins the mode as a sticky lock that ordinary selection
clicks won’t clear — re-click it to go back to following the selection.
The design frame + device preview. A scene is authored against a design resolution —
a fixed reference size (e.g. 1920 × 1080 landscape or 750 × 1334 portrait). This is a
project-level value (Project Settings → Display), not a UI-layer one: the viewport’s
Design and Device controls work in every editor mode (Scene / UI / Tilemap), so
you can preview a gameplay-only scene on a real device without a UI Canvas. When the
scene has a Canvas, UI additionally lays out inside the frame per its scale mode.
- Design dropdown (viewport toolbar) — sets the design resolution and reframes to it (undoable). With a Canvas it edits that Canvas; otherwise it edits the project value.
- Device dropdown — simulates a target screen (iPhone / iPad / 1080p …) in any mode: draws the device’s aspect as letterbox bars + safe-area insets over your scene, so you preview how it fits. A preview only — it does not change your design resolution.
- Camera Fit (Project Settings → Display) — how the main camera scales the design
resolution, independent of any UI Canvas.
None(default) keeps the camera’s own orthoSize; any other mode letterboxes the game the same way on every device, and the device preview then shows the real framing (WYSIWYG for gameplay, not just UI).
Building a scene
Section titled “Building a scene”Creating entities
Section titled “Creating entities”There are several ways to add an entity:
- Entity → Add Entity (or the toolbar) drops a blank Transform entity.
- Create… opens a command-palette that spawns entities: the built-ins — Empty,
Sprite, Camera, Particles, Light, Tilemap, Spine, Audio,
Text, Shape, Mesh, Trail, and the UI widgets (Canvas plus
controls) — your own project components, and any
.esprefabprefab in the project. Every create path (this menu, drag-and-drop, and the automation surface) runs the same pipeline, so each spawn is a single undo step. - Right-click in the Outliner for the same actions in context, plus folders, parenting, and prefab creation.
- Drag from the Content Browser — drop an image to spawn a Sprite, or a
.esprefabto instantiate it.
The World Outliner
Section titled “The World Outliner”The Outliner is the scene’s hierarchy. You can:
- Reparent by dragging entities onto one another, and organize with folders.
- Type to jump — with the tree focused, type the first letters of a name to jump to the matching entity.
- Rename with
F2, Duplicate with Ctrl/⌘ + D, Delete with Delete. - Hide/Show and Lock/Unlock entities (independent of whether the component is enabled at runtime).
- Create Prefab from a selection, then drop instances back into the scene.
The Details panel
Section titled “The Details panel”Details is the inspector for the selection. It lists every component on the entity and its fields — driven by the engine’s reflection metadata, so ranges, units, enums, and tooltips come straight from the component definition. Add components, edit values, and they’re written back to the scene live. Fields enforce their constraints as you edit: a required field is flagged when left empty, a numeric field is clamped to its declared range on write, and dropping an asset onto a slot is rejected unless its type matches.
Each component is a collapsible section, and the panel remembers what you fold —
across reselects and editor restarts — so an inspector stays as tidy as you leave it.
Rarely-touched “chrome” (a widget’s Focusable and ThemeStyle tags) starts folded.
Where a visual control beats a row of raw numbers, Details shows a purpose-built widget — most of them for UI nodes:
- an anchor control for absolutely-positioned
UINodes: a clickable 3×3 grid for the nine point anchors (Left / Centre / Right × Top / Middle / Bottom) plus a Stretch toggle per axis; - a flex (auto-layout) widget for
FlexContainers: Direction (row / column and their reverses), a 3×3 alignment grid that sets main- and cross-axis alignment in one click, main-axis Distribute (Packed / Between / Around / Evenly), and Wrap / Stretch toggles — with padding edited as a four-edgesidescontrol; - an inline Controllers strip that pulls per-node state authoring into the inspector: pick a state page and gear a field to bind it, all without leaving the panel (see UI controllers);
- for a material, a Shader picker to swap the bound shader — a built-in template or
a project
.esshader— see Materials & Shaders.
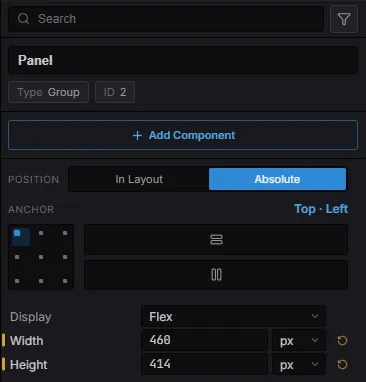
A UI node’s inspector: the In Layout / Absolute toggle, the clickable 3×3 anchor grid (with per-axis Stretch), and Display: Flex — visual controls in place of raw numbers.
Details also serves as the asset inspector: select an asset in the Content Browser to edit its import settings or, for a material, its parameters.
The Content Browser
Section titled “The Content Browser”The Content Browser is your project’s asset explorer. Its create menu makes new assets in place:
- New Scene, New Animation, New Input Map, New Material, New Material Graph, New Shader, New State Machine, New Behavior Tree, New Folder.
- Context actions per asset type: Create Tileset (from a texture), Create Tilemap (from a tileset), Create Material Instance (from a material).
Import by dragging files in from Finder / Explorer, or via Import…. Each asset gets
a .meta sidecar the first time it’s seen. Per-asset context actions include Rename,
Duplicate, Copy Path, Copy Reference, Find Usages, Show in Explorer, and Delete.
Rename, move, and duplicate each post a toast with an Undo action — and renaming or
moving an asset rewrites its references in every open document, so nothing dangles.
Delete first lists every scene, prefab, and asset that references the file (so you
know exactly what breaks), then moves it to the OS trash — still recoverable with Undo.
The folder tree is fully keyboard-driven — arrows walk and collapse/expand, Enter opens
a folder.
Find Usages — right-click an asset, or click the reference count in the Inspector’s asset details — lists everywhere a texture, material, prefab, or scene is referenced, across the on-disk dependency graph and the unsaved open scene.
Play-in-editor
Section titled “Play-in-editor”The Play controls in the toolbar run your game:
- Play starts the game; while running the same button becomes Stop, with Restart and Pause/Resume as side buttons.
- The play-mode dropdown chooses Play In Viewport (the game hosts over the viewport) or Play In New Window (a dedicated Game tab), and toggles Maximize Viewport on Play — which hands the whole workspace to the running game and restores your layout on Stop.
- A running game reads as a soft accent ring around the viewport (amber, with the frame dimmed, when paused) — not a badge over the game.
- Shortcuts: F5 play, Esc stop, F6 pause/resume, Shift+F5 restart, and F11 to maximize/restore the viewport at any time.
Because play uses an isolated realm — the same runtime that ships your game — what you see in play is what a player gets.
Autosave & recovery
Section titled “Autosave & recovery”The editor periodically snapshots your unsaved documents — only when there are unsaved changes and no Play session is running — so a crash or power loss never costs more than the last few moments of work. A snapshot is kept in your project’s workspace folder and never counts as a real save. The next time you open the project, if a snapshot is newer than the file on disk, the editor offers to restore it; saving the document supersedes its snapshot. This sits alongside the crash minidump and the automatic reload if the GPU render process is lost.
Specialized editors
Section titled “Specialized editors”Double-click an asset in the Content Browser to open its editor in a document tab.
- Sequencer — a timeline / curve editor for keyframe animation. See Timeline.
- Tilemap painter — tools for brush, erase, rectangle, line, bucket, select,
eyedropper, and terrain (autotile), plus stamp flip-H / flip-V / rotate-90°
(
H/V/Rwhile a paint tool is active) and a random-scatter mode (D). The palette selects with the arrow keys (Shiftgrows a multi-tile stamp), and maps can be orthogonal, isometric, staggered, or hexagonal. See Tilemaps. - Tileset editor — author per-tile collision (box, circle, polygon, slope presets; one-way / sensor / material modifiers) with direct-manipulation shape editors on a magnified tile: drag a circle’s centre or radius, click-add / drag / click-delete a polygon’s vertices, and pick a one-way platform’s solid side (top / bottom / left / right) — resizing keeps the sensor / material / density modifiers. Also terrain sets for autotiling (edge/corner peering or multi-color corner Wang), per-tile probability weights and properties, and animated tiles — drag frame thumbnails to reorder, or set the whole loop to one uniform duration, with a live preview.
- State Machine (
.esfsm) and Behavior Tree (.esbt) editors — visual graphs for AI. See Gameplay AI. - Material Graph (
.esmatgraph) — a node editor that compiles to a shader. See Materials & Shaders.
The State Machine and Behavior Tree editors share a common node canvas: middle-drag to pan, wheel to zoom toward the cursor, drag an output handle onto another node to connect them, click to select a node or edge, Delete to remove it, and right-click the canvas to add a node at the cursor.
Project settings
Section titled “Project settings”Open settings with Ctrl / ⌘ + , or the Activity Bar’s gear. Settings are grouped:
- Editor — Appearance (language, accent color, UI scale), Viewport (grid, snapping, gizmos), Keyboard Shortcuts (every shortcut below is rebindable here), and Console.
- Project (saved into
project.esproject):- Display — the project design resolution (seeds new Canvases + drives the device
preview in any scene), the project-wide screen orientation (every export target
honors it; unset ⇒ derived from the design resolution’s aspect), and the camera fit
(how the main camera scales the design resolution without a UI Canvas;
None= off). - UI — the project’s widget theme (dark / light) and per-role Theme Colors overrides, applied identically in the editor, Play, and every export. See UI widgets — theming.
- Physics — enable, gravity, sixteen collision-layer names and a 16×16 collision matrix, plus solver tuning (fixed timestep, sub-steps, contact Hz/damping/push speed, sleeping, continuous collision). See Physics.
- Rendering — named sorting layers that populate the inspector’s layer dropdown.
- Packaging — per-target metadata: WeChat AppID, Desktop app id / product name.
- Display — the project design resolution (seeds new Canvases + drives the device
preview in any scene), the project-wide screen orientation (every export target
honors it; unset ⇒ derived from the design resolution’s aspect), and the camera fit
(how the main camera scales the design resolution without a UI Canvas;
Editor language
Section titled “Editor language”The editor ships in English and 简体中文 and follows your system language on first launch. Switch it under Settings → Appearance → Language — the change applies after a reload (the editor prompts for one). The editor’s UI strings run on the same localization engine your game uses at runtime.
Keyboard shortcuts
Section titled “Keyboard shortcuts”mod is ⌘ on macOS and Ctrl elsewhere. All of these are rebindable under
Settings → Keyboard Shortcuts.
| Action | Shortcut |
|---|---|
| New Scene | mod + N |
| Open Project | mod + O |
| Save Scene | mod + S |
| Save Scene As | mod + shift + S |
| Undo / Redo | mod + Z / mod + shift + Z |
| Duplicate | mod + D |
| Copy / Cut / Paste | mod + C / mod + X / mod + V |
| Delete | Delete / Backspace |
| Select All | mod + A |
| Select / Move / Rotate / Scale tool | Q / W / E / R |
| Nudge selection (×10 with Shift) | Arrow keys |
| Frame Selected | F |
| Play · Stop | F5 · Esc |
| Pause/Resume · Restart | F6 · shift + F5 |
| Maximize / restore viewport | F11 |
| Command Palette | mod + shift + P |
| Content Drawer | Ctrl + Space |
| Project Settings | mod + , |
The Command Palette (mod + shift + P) fuzzy-searches every runnable command —
the fastest way to reach any action without hunting through menus.
Beyond the command shortcuts, the editor is keyboard-navigable throughout: menus
and context menus move with the arrow keys (plus type-ahead, Home/End, and → /
← for submenus), the Outliner jumps to entities as you type, the Content
Browser’s folder tree and the tile palette both walk with arrows, and keyboard
focus is always shown with a visible focus ring.
See also
Section titled “See also”- Scenes — what a
.essceneholds and how it loads. - Scripting — project components appear in the inspector automatically.
- Prefabs — reusable entity templates with per-instance overrides.
- Building & Exporting — ship the project to web, WeChat, or a playable ad.