Perception
A Perceiver senses nearby PerceptionTargets within a sight cone and writes
what it sees into a Perception component.
Estella’s AI layer turns an entity into an actor that senses, decides, and moves. It is built from four cooperating pieces that share one design:
Perception
A Perceiver senses nearby PerceptionTargets within a sight cone and writes
what it sees into a Perception component.
Navigation
A NavGrid + A* pathfinding moves a NavAgent to any world point, replanning
as the target moves.
State machines
A StateMachineAgent runs an .esfsm graph — states with enter/update/exit
hooks and guarded transitions.
Behavior trees
A BehaviorTreeAgent runs an .esbt graph — selectors, sequences, decorators,
and leaves.
The unifying idea: state machines and behavior trees are two authoring paradigms over the same building blocks. You register named actions and conditions once, in code, then wire them into either an FSM or a BT — graphs authored visually in the editor, not hardcoded. Perception feeds the decision; the decision drives navigation.
An action does something (chase, attack, play a sound); a condition answers a yes/no question (do I see the player?). You register each under a name, once, and both the FSM and the BT resolve those names against the same registry — so one set of leaves serves both paradigms.
import { registerAction, registerCondition, Status, Perception, setNavDestination } from 'esengine';
registerCondition('seesPlayer', (ctx) =>  ctx.has(Perception) && ctx.get(Perception).visible);
registerAction('chase', (ctx) => {  const per = ctx.get(Perception);  setNavDestination(ctx.world, ctx.entity, { x: per.targetX, y: per.targetY });});
Every action and condition receives an AiContext for the agent it runs on. It
is the same programming model as a defineBehavior update
— entity, world, and commands access — plus a per-agent blackboard:
| Member | Type | Description |
|---|---|---|
ctx.entity |
Entity |
The agent this action/condition runs for. |
ctx.dt |
number |
Frame delta in seconds. |
ctx.world |
World |
Full world access for cross-entity reads. |
ctx.commands |
Commands |
Deferred spawn/despawn, safe mid-tick. |
ctx.blackboard |
Blackboard |
This agent’s AI data plane (see Blackboard). |
ctx.get(Comp) |
ComponentData |
Read another component on this entity. |
ctx.set(Comp, data) |
void |
Write a component on this entity. |
ctx.has(Comp) |
boolean |
Whether this entity has Comp. |
A condition always returns a boolean. An action may return a Status
or nothing:
export enum Status { Success = 'success', Failure = 'failure', Running = 'running' }Status to run across frames (Running),
succeed, or fail. Returning nothing counts as Success.Writing an action that returns Status lets the same action serve as a BT leaf and
an FSM hook.
The engine pre-registers a few names, so common glue needs no code at all — they appear in the editor palettes next to your own. All of them operate on components of the agent entity (the same channel your code and the editor use):
| Name | Kind | Effect |
|---|---|---|
timeline.play |
action | Raise the agent’s TimelinePlayer play flag. On a finished clip this replays it from the top. |
timeline.pause |
action | Lower the play flag (resume with timeline.play). |
timeline.finished |
condition | True once the clip has completed (a once clip that ran to its end) and is not playing. |
spriteAnim.play |
action | Play the agent’s sprite flipbook; the argument switches to that clip. |
spriteAnim.restart |
action | Rewind the flipbook to frame 0 and play (argument switches clip). |
spriteAnim.stop |
action | Pause the flipbook. |
spriteAnim.finished |
condition | True once a one-shot sprite clip has finished. |
Actions can carry an optional string argument — set it next to the action
name in the FSM state inspector (or on a BT action node). Built-ins use it for
data the component can’t carry per-state, like which clip spriteAnim.play
should switch to; your own registered actions receive it as their third
parameter: (ctx, blackboard, arg) => ….
Together they make a code-free cutscene state: entering the state starts the clip, and its completion drives the transition out.
registerFsm('intro', { initial: 'Cutscene', states: [ { name: 'Cutscene', onEnter: 'timeline.play', transitions: [{ to: 'Gameplay', condition: 'timeline.finished' }], }, { name: 'Gameplay' }, ],});The agent entity carries the TimelinePlayer (which clip, speed, wrap mode) — the
FSM only flips its flags. Built-in names never shadow yours: if you register an
action or condition under the same name, your registration wins. Avoid the
timeline. prefix for game names to keep the namespaces apart.
In the FSM / behavior-tree editors, the action and condition fields suggest every registered name as you type — grouped by namespace, with built-ins carrying a short description of what they do. Free text stays legal for names your game registers at runtime.
The cutscene example
is this pattern end-to-end: an intro timeline plays on scene start, gameplay
unlocks when it completes, and R replays it — with zero registered actions.
A Perceiver scans for the nearest visible PerceptionTarget each frame and writes
the result into a Perception component on the same entity. Decisions read
Perception; sensing is just ECS data, not a side channel.
import { Perceiver, PerceptionTarget, Perception } from 'esengine';
// The hunter senses…cmds.spawn()  .insert(Transform, { position: { x: -200, y: 0, z: 0 } })  .insert(Perceiver, { range: 260, fovDegrees: 120 })  .insert(Perception, {});          // written every frame by the perception plugin
// …anything tagged as a target.cmds.spawn() .insert(Transform, { position: { x: 100, y: 0, z: 0 } }) .insert(PerceptionTarget, {});| Component | Field | Default | Description |
|---|---|---|---|
Perceiver |
range |
220 |
Sight range in world pixels. |
fovDegrees |
360 |
Field-of-view cone in degrees (360 = omnidirectional). |
|
Perception |
visible |
false |
A target is currently seen. |
distance |
0 |
Distance to the seen target. | |
targetX, targetY |
0 |
Seen target position, world pixels. | |
dirX, dirY |
0 |
Unit direction from observer to target. | |
PerceptionTarget |
(tag) | — | Marks an entity as sensable by Perceivers. |
The FOV cone is oriented by the perceiver’s Transform rotation. Perception is a
transient, runtime-only component — the plugin rewrites it every frame, so you never
author its values.
Navigation moves an agent to a world point along a route that avoids blocked cells,
using A* over a NavGrid.
A NavGrid is a rectangular grid of walkable/blocked cells. Install it on the Nav
resource so agents can path against it:
import { defineSystem, Res, Nav, NavGrid } from 'esengine';
export const setupNav = defineSystem([Res(Nav)], (nav) => {  nav.setGrid(new NavGrid({    width: 60,          // columns    height: 44,         // rows    cellSize: 20,       // world pixels per cell    origin: { x: -600, y: -440 },  // world position of cell (0,0)'s center  }));}, { name: 'SetupNav' });
NavGrid option |
Type | Description |
|---|---|---|
width |
number | Cell columns. |
height |
number | Cell rows. |
cellSize |
number | World pixels per cell (square). |
origin |
Vec2 |
World position of cell (0,0)’s center. Defaults to (0,0). |
walkable |
Uint8Array |
Optional row-major width*height mask, 1 = walkable, 0 = blocked. Omitted → all walkable. |
To derive a grid from a painted tilemap instead of hand-authoring the mask, use
navGridFromTilemapLayer (which cells a layer’s solid tiles block) or
navGridFromTiles.
Attach a NavAgent, then point it at a destination. The built-in nav plugin plans
the path and steps the agent along it each frame — you just set the goal.
import { NavAgent, setNavDestination, stopNavAgent } from 'esengine';
cmds.spawn()  .insert(Transform, { position: { x: 0, y: 0, z: 0 } })  .insert(NavAgent, { speed: 140, arriveRadius: 8 });
// From any system/action with world access — safe to call every frame:setNavDestination(world, entity, { x: 320, y: -120 });// …and to halt in place:stopNavAgent(world, entity);
NavAgent field |
Default | Description |
|---|---|---|
speed |
120 |
Movement speed in world pixels per second. |
radius |
12 |
Agent radius (arrival tolerance / collision size). |
arriveRadius |
6 |
Stop distance from the final goal. |
repathInterval |
0.5 |
Seconds between replans while moving; 0 = replan only when the target changes. |
hasTarget |
false |
Whether a destination is set (managed for you). |
targetX, targetY |
0 |
Current destination in world pixels. |
arrived |
false |
Set true the frame the agent reaches its goal. |
setNavDestination is safe to call every frame to chase a moving target — the agent
only replans when the target actually moves or repathInterval elapses. Read
agent.arrived (or Perception) to know when to switch behavior.
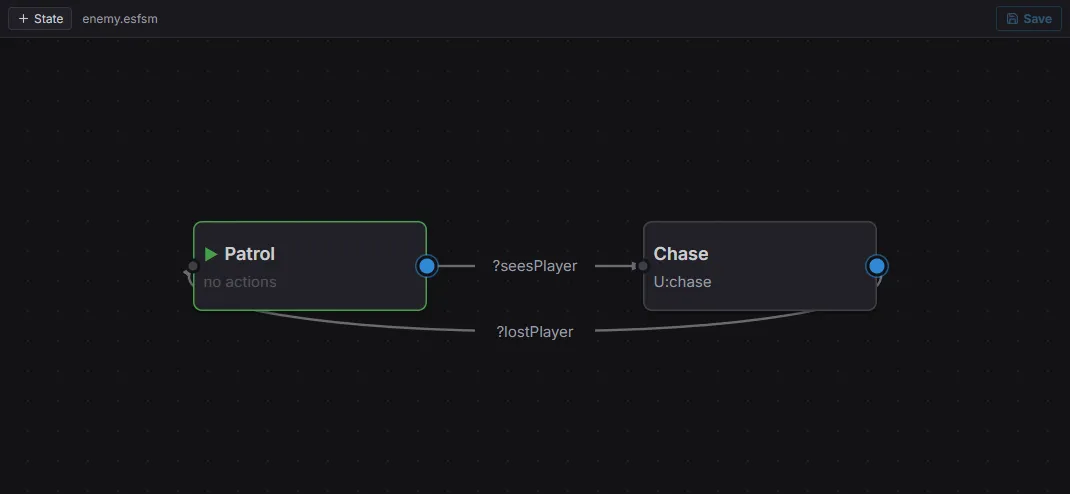
The state-machine editor: states (Patrol / Chase) linked by guarded transitions (?seesPlayer, ?lostPlayer).
A state machine is a set of states connected by guarded transitions. Exactly
one state is active; each tick, its outgoing transitions are checked in order and the
first enabled one is taken. Attach a StateMachineAgent and point it at a graph:
import { StateMachineAgent } from 'esengine';
cmds.spawn()  .insert(NavAgent, {})  .insert(Perceiver, { range: 240 })  .insert(Perception, {})  .insert(StateMachineAgent, { fsm: 'ai/enemy.esfsm' });   // an editor-authored asset
StateMachineAgent field |
Description |
|---|---|
fsm |
Key of the machine to run: a registerFsm name or an .esfsm asset path. |
current |
Active state name, written each tick (read-only; visible in the inspector). |
The recommended path is to author the graph in the editor as an .esfsm asset
(see Authoring in the editor). The states reference your
registered action/condition names by string. You can also build a machine in code:
import { registerFsm } from 'esengine';
registerFsm('guard', {  initial: 'Patrol',  states: [    {      name: 'Patrol',      onUpdate: 'patrol',      transitions: [{ to: 'Chase', condition: 'seesPlayer' }],    },    {      name: 'Chase',      onEnter: 'startChase',      onUpdate: 'chase',      transitions: [{ to: 'Patrol', condition: 'lostPlayer' }],    },  ],});
Each state carries up to three named hooks — onEnter, onUpdate, onExit — and a
list of transitions. A transition is enabled when all of its specified
mechanisms hold; a transition with none is unconditional:
| Transition field | Description |
|---|---|
to |
Destination state name. |
trigger |
A one-shot event name that must be fired (consumed when taken). |
condition |
A registered condition that must return true. |
guard |
One or more blackboard comparisons, AND-combined. |
Guards compare a blackboard key with ==, !=, <, <=, >, >=, truthy, or
falsy — e.g. { key: 'health', op: '<', value: 20 }.
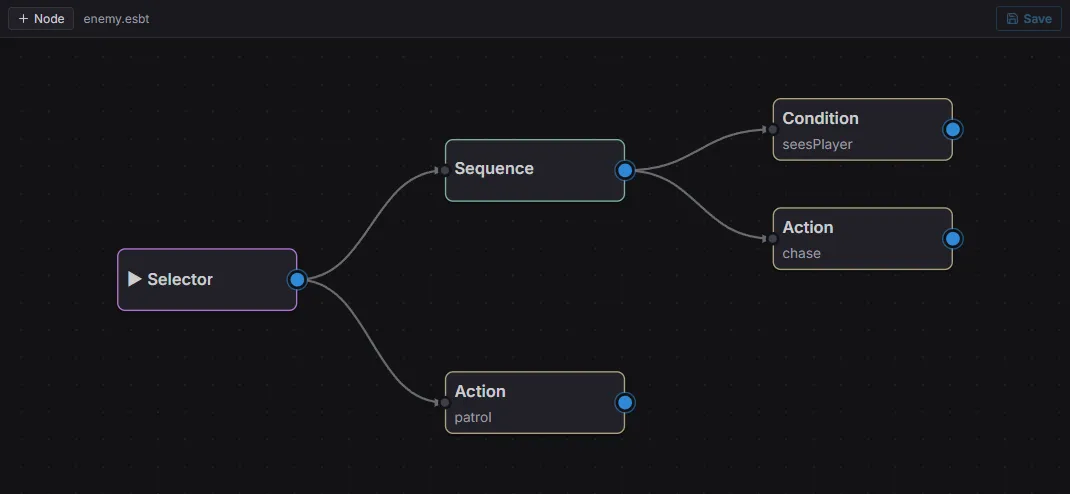
The behavior-tree editor: a Selector root over a Sequence (Condition seesPlayer → Action chase) with a fallback patrol action.
A behavior tree ticks from its root every frame and returns a Status. Composite
nodes control flow; decorators transform one child’s result; leaves are your
registered actions and conditions. Attach a BehaviorTreeAgent:
import { BehaviorTreeAgent } from 'esengine';
cmds.spawn()  .insert(NavAgent, {})  .insert(Perception, {})  .insert(BehaviorTreeAgent, { bt: 'ai/enemy.esbt' });   // an editor-authored asset
BehaviorTreeAgent field |
Description |
|---|---|
bt |
Key of the tree to run: a registerBt name or an .esbt asset path. |
status |
Last root status, written each tick (read-only). |
Author the tree visually in the editor, or build it in code with registerBt:
import { registerBt } from 'esengine';
registerBt('guard', {  root: {    type: 'selector',            // try children left→right until one succeeds    children: [      {        type: 'sequence',        // all must succeed, in order        children: [          { type: 'condition', name: 'seesPlayer' },          { type: 'action', name: 'chase' },        ],      },      { type: 'action', name: 'patrol' },    ],  },});
Node types:
| Category | Type | Behavior |
|---|---|---|
| Composite | sequence |
Ticks children in order; fails on the first failure, succeeds if all succeed. |
selector |
Ticks children in order; succeeds on the first success, fails if all fail. | |
parallel |
Ticks all children; policy: 'one' succeeds when any does, 'all' (default) when all do. |
|
| Decorator | inverter |
Inverts its child’s Success/Failure. |
succeeder |
Always reports Success. | |
repeater |
Re-runs its child count times (0 = forever). |
|
wait |
Runs for seconds before reporting Success. |
|
| Leaf | action |
Runs the registered action name; its Status (or Success on void) propagates up. |
condition |
Returns Success when the registered condition name is true, else Failure. |
Every FSM/BT agent owns a Blackboard — its private key/value store plus one-shot
event triggers. Actions and conditions reach it through ctx.blackboard; it’s how AI
state flows between leaves and how transition guards get their values.
registerAction('takeDamage', (ctx) => { const hp = (ctx.blackboard.get<number>('health') ?? 100) - 10; ctx.blackboard.set('health', hp); if (hp <= 0) ctx.blackboard.fire('died'); // a transition keyed on 'died' fires once});| Method | Description |
|---|---|
get<T>(key) / set(key, value) |
Read/write a value. |
has(key) / delete(key) |
Test / remove a key. |
fire(trigger) |
Fire a one-shot event; a transition keyed on it becomes enabled until taken. |
isFired(trigger) / consume(trigger) |
Test / clear a trigger. |
Blackboard values back the guard comparisons on FSM transitions, and the trigger
mechanism is the Unity-style edge event: fired once, consumed by the transition that
takes it.
The intended workflow is data, not code for the graphs themselves — you register the leaf logic once, then build and tune the machines/trees visually:
.esfsm) or Behavior
Tree (.esbt) asset and double-click it to open the node-graph editor.StateMachineAgent.fsm (or BehaviorTreeAgent.bt) to the
asset’s path.The asset is referenced by path and preloaded with the scene, so the graph is
registered before the agent first ticks — no registerFsm/registerBt call needed.
Because both paradigms resolve leaves from the same registry, you can prototype an
enemy as a state machine and later swap in a behavior tree (or run both) without
touching your action/condition code.
Nav, NavAgent, and Perceiver — the component layer — cover the common cases.
The primitives beneath them are exported too, all pure TypeScript with no engine
or wasm dependency, for when you need a path without an agent or a sight check
without a Perceiver.
findPath is the A* the nav plugin uses: uniform-cost search over NavGrid
cells, 4- or 8-connected, with an octile/manhattan heuristic and no corner
cutting (a diagonal step needs both shared orthogonal cells open). Drop to it
when you steer movement yourself, draw a path preview, or compute reachability
for turn-based ranges — or when one grid isn’t enough, since the Nav resource
holds a single grid:
import { NavGrid, findPath, pathToWorld } from 'esengine';
const grid = new NavGrid({ width: 32, height: 24, cellSize: 32 });
const path = findPath(  grid,  grid.worldToCell(hero.x, hero.y),      // Cell — integer grid coordinates  grid.worldToCell(chest.x, chest.y),  { diagonal: false },);if (path) {  const waypoints = pathToWorld(grid, path);   // Vec2[] — cell centers, world pixels}
findPath(grid, start, goal, opts?) returns the Cell[] path inclusive of both
endpoints, or null when unreachable. A Cell is an integer grid coordinate
{ x, y } (kept distinct from Vec2 to flag cell space); convert with
grid.worldToCell / grid.cellToWorld, or turn a whole path into world-space
waypoints with pathToWorld.
PathfindOptions field |
Default | Description |
|---|---|---|
diagonal |
true |
Allow 8-connected diagonal moves. |
snapRadius |
8 |
When start/goal lands on a blocked cell, snap to the nearest walkable cell within this ring radius before searching; 0 disables snapping. |
navGridFromTiles builds the walkability mask from any tile reader — it is the
core under navGridFromTilemapLayer, which just plugs in TilemapAPI.getTile:
import { navGridFromTiles } from 'esengine';
const grid = navGridFromTiles((x, y) => level.tiles[y][x], {  width: 32, height: 24, cellSize: 32,  blockedTileIds: [WALL_TILE, WATER_TILE],});
BuildNavGridOptions field |
Description |
|---|---|
width / height / cellSize / origin? |
Same as the NavGrid options (see Building a grid). |
blockedTileIds? |
Exact set of tile ids that block movement. |
isBlocked? |
Custom predicate over the tile id (0 = empty); overrides blockedTileIds. With neither given, any non-empty tile blocks. |
The perception plugin is a thin wrapper over four exported functions — useful for one-off sight checks from an action, custom senses (memory, hearing, multiple targets), or unit tests against a fake world:
senseTarget(ox, oy, facing, tx, ty, range, halfFov, isBlocked?) — the pure
geometry: a range check, a FOV cone check (halfFov is half the cone in
radians; ≥ π means omnidirectional), then the optional occlusion callback.facingFromQuat(z, w) — 2D facing angle in radians from a Transform
rotation quaternion’s z/w components.makeLosCheck(physics) — builds the occlusion callback from a physics
raycast: occluded when any hit lands clearly short of the target
(fraction < 0.98 — the last ~2% is the target itself).stepPerception(world, isBlocked?) — the exact per-frame step the plugin
runs in PreUpdate: for every Perceiver, sense all PerceptionTargets, keep
the nearest visible one, and write the Perception component.import { senseTarget, facingFromQuat, Transform, registerCondition } from 'esengine';
// A one-off sight check against a POINT — no PerceptionTarget needed.registerCondition('seesShrine', (ctx) => { const tf = ctx.get(Transform); const facing = facingFromQuat(tf.rotation.z, tf.rotation.w); return senseTarget( tf.position.x, tf.position.y, facing, SHRINE.x, SHRINE.y, 300, Math.PI / 3, // 300 px range, 120° cone ).visible;});senseTarget returns a SenseResult:
SenseResult field |
Description |
|---|---|
visible |
The target is within range, inside the cone, and not occluded. |
distance |
Distance to the target — always set, even when not visible. |
dirX / dirY |
Unit direction observer → target; (0, 0) when not visible. |
The built-in system wires makeLosCheck in only when the physics module is
loaded; otherwise sensing is range + FOV only — the AI layer has no hard physics
dependency.
The perception, FSM, BT, and navigation plugins are part of the default plugin set,
so the editor and the esengine web runtime add them for you. Only when you build
an app from a bare new App() do you add them explicitly:
import { perceptionPlugin, fsmPlugin, btPlugin, navPlugin } from 'esengine';
app.addPlugin(perceptionPlugin);app.addPlugin(fsmPlugin);app.addPlugin(btPlugin);app.addPlugin(navPlugin);
Each is exported both as a ready-to-use singleton (navPlugin) and as a class
(NavPlugin) if you need multiple instances.
The enemy-ai example
hunts a player with two enemies that share the same senses and leaves — one driven by
a state machine, the other by a behavior tree:
import {  defineSystem, Res, Nav, NavGrid,  registerAction, registerCondition, setNavDestination, Perception,} from 'esengine';
// Shared leaves — the same names serve BOTH the .esfsm and the .esbt.registerCondition('seesPlayer', (ctx) => ctx.has(Perception) && ctx.get(Perception).visible);registerCondition('lostPlayer', (ctx) => !ctx.has(Perception) || !ctx.get(Perception).visible);
registerAction('chase', (ctx) => {  if (!ctx.has(Perception)) return;  const per = ctx.get(Perception);  if (per.visible) setNavDestination(ctx.world, ctx.entity, { x: per.targetX, y: per.targetY });});registerAction('patrol', () => { /* hold position until the player is seen */ });
// One open nav grid over the arena.export const setupNavGrid = defineSystem([Res(Nav)], (nav) => {  nav.setGrid(new NavGrid({ width: 60, height: 44, cellSize: 20, origin: { x: -600, y: -440 } }));}, { name: 'SetupNavGrid' });
The two enemies’ StateMachineAgent.fsm and BehaviorTreeAgent.bt point at
enemy.esfsm / enemy.esbt — authored in the editor, loaded by the engine.
Perception, the FSM/BT ticks, and nav following are all built-in, so the only game
code is the shared leaves above plus the one-time grid.
.esfsm / .esbt assets load and serialize with the scene.fsm.fire into a state
machine; actions and conditions come from this same registry.