物理
Estella 的物理跑在 C++/WebAssembly 内核里,由 Box2D v3 驱动。你给实体加一个 RigidBody
和一个碰撞体,然后用力移动它、用射线查询世界、响应碰撞、用关节连接刚体。物理以固定时间步
推进,与帧率解耦,得到稳定的模拟。
物理是一个可选的侧模块。在编辑器和 Web 运行时里,当场景使用物理组件时会自动加载。在自定义
应用里,自己加插件(重力默认 { x: 0, y: -9.81 }):
import { PhysicsPlugin } from 'esengine/physics';
app.addPlugin(new PhysicsPlugin('physics.js', { gravity: { x: 0, y: -9.81 } }));Box2D 以米模拟;引擎其余部分以世界像素工作。二者的换算系数是当前的
每单位像素数(PPU)——Canvas.pixelsPerUnit,默认每米 100 像素。物理 API 的
每一部分都固定站在这条边界的某一侧:
| 表面 | 单位 |
|---|---|
碰撞体组件尺寸——halfExtents、radius、offset…… |
米。 |
面向求解器的方法——applyForce / applyImpulse、setLinearVelocity / getLinearVelocity、setGravity…… |
米(m/s、m/s²)。 |
空间查询——raycast、shapeCast*、overlapCircle / overlapAABB、moveCharacter |
世界像素,按当前 PPU 缩放。 |
CharacterController.velocity、MotorJoint.linearVelocity |
世界像素/秒。 |
physics.getPixelsPerUnit() 返回当前 PPU(每帧从 Canvas 推送),换算永远不用写死 100:
const ppu = physics.getPixelsPerUnit(); // world pixels per meterconst speedPx = physics.getLinearVelocity(e).x * ppu; // m/s → px/sphysics.applyImpulse(e, { x: 0, y: jumpPx / ppu }); // px/s → m/s混用两个空间——把像素传给 applyForce,或把米传给 raycast——是最常见的物理 bug。
拿不准时记住:组件与求解器 = 米;查询与角色控制器 = 像素。
刚体与碰撞体
Section titled “刚体与碰撞体”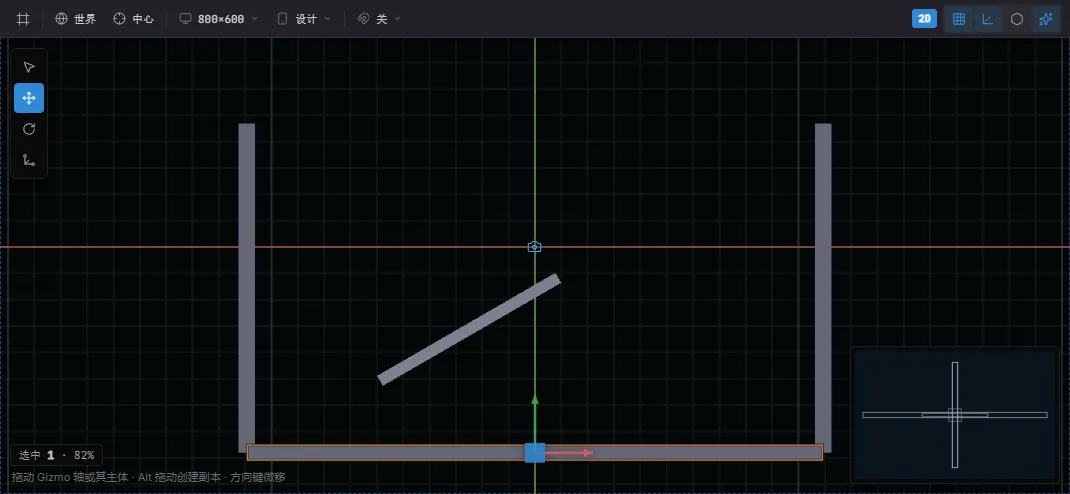
视口里的碰撞体 gizmo:选中的 Ground 的盒形轮廓(琥珀色),以及墙体与斜坡。用视口的物理显示开关切换。
加一个 RigidBody 再加一个碰撞体形状。碰撞体尺寸以米计,不是像素——把像素尺寸除以你的
每单位像素数(见单位)。从一个取 Commands() 的系统里生成:
import {  defineSystem, Commands, Transform,  RigidBody, BodyType, CircleCollider,} from 'esengine';
const PPU = 100;   // = Canvas.pixelsPerUnit; read the live value via physics.getPixelsPerUnit()
const spawnBall = defineSystem([Commands()], (cmds) => {  cmds.spawn()    .insert(Transform, { position: { x: 0, y: 250, z: 0 } })    .insert(RigidBody, { bodyType: BodyType.Dynamic, gravityScale: 1 })    .insert(CircleCollider, { radius: 24 / PPU, density: 1, friction: 0.3, restitution: 0.4 });});
RigidBody
Section titled “RigidBody”| 属性 | 类型 | 默认 | 说明 |
|---|---|---|---|
bodyType |
BodyType |
Dynamic |
Static(不动)、Kinematic(由代码移动)、Dynamic(被模拟)。 |
gravityScale |
number | 1 |
世界重力的倍率(0 = 漂浮)。 |
linearDamping |
number | 0 |
线速度阻尼。 |
angularDamping |
number | 0 |
角速度阻尼。 |
fixedRotation |
boolean | false |
锁定旋转(角色常用)。 |
bullet |
boolean | false |
对快速细小刚体做连续碰撞(防穿透)。 |
enabled |
boolean | true |
关掉即从模拟中移除。 |
所有碰撞体共享这些字段,各自再加自己的形状参数。尺寸以米计。
| 共享属性 | 类型 | 默认 | 说明 |
|---|---|---|---|
offset |
Vec2 | {0, 0} |
相对实体原点的局部偏移。 |
density |
number | 1 |
单位面积质量(决定刚体质量)。 |
friction |
number | 0.3 |
表面摩擦,0..1+。 |
restitution |
number | 0 |
弹性,0..1。 |
isSensor |
boolean | false |
检测重叠但无物理响应(触发器)。 |
categoryBits |
number | 0x0001 |
该碰撞体所在的碰撞层。 |
maskBits |
number | 0xFFFF |
它与哪些层碰撞。 |
enabled |
boolean | true |
关掉该形状。 |
| 组件 | 形状参数 |
|---|---|
BoxCollider |
halfExtents({0.5, 0.5})、radius(圆角,0.05)。 |
CircleCollider |
radius(0.5)。 |
CapsuleCollider |
radius、halfHeight。 |
SegmentCollider |
point1、point2(单边)。 |
PolygonCollider |
vertices: Vec2[]、radius(圆角)。 |
ChainCollider |
points: Vec2[]、isLoop(静态边链;无 density/isSensor)。 |
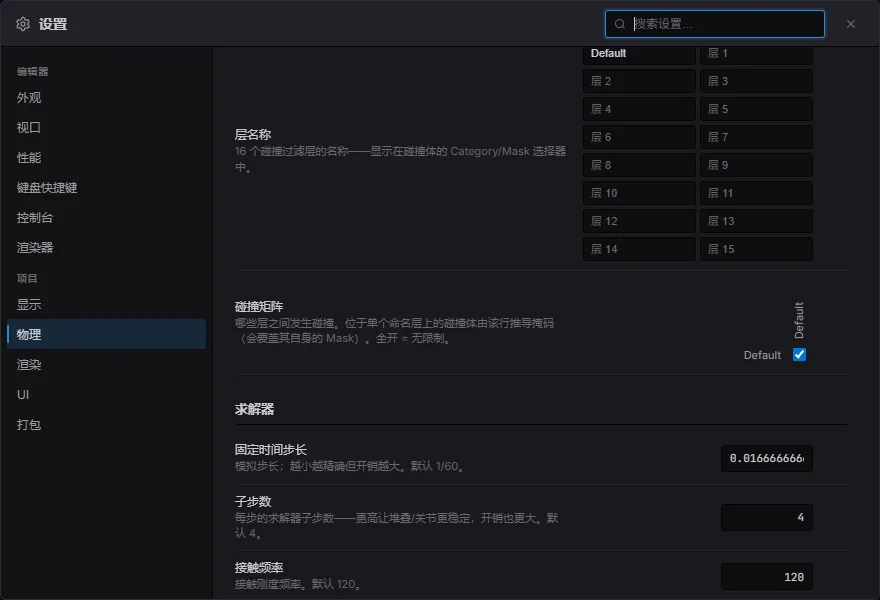
项目设置 → 物理:给 16 个碰撞层命名,再在矩阵里切换哪些层两两相撞(下方还有求解器调参)。
categoryBits(刚体在哪一层)和 maskBits(它与什么碰撞)是 16 位过滤器。仅当彼此的 category
都在对方的 mask 里,两个刚体才碰撞:
const LAYER_PLAYER = 0x0001;const LAYER_ENEMY  = 0x0002;const LAYER_GROUND = 0x0008;
.insert(CircleCollider, { radius: 16 / PPU, categoryBits: LAYER_PLAYER, maskBits: LAYER_ENEMY | LAYER_GROUND, // ignores other players});碰撞层是唯一的交互开关——碰撞、hit 事件、以及传感器检测都用它。碰撞体无需单独开启就能 被传感器检测到:只要它的层通过了传感器的过滤,就会被检测。想让某物不触发某传感器,用层排除它 (而不是某个 per-collider 开关);想在拥挤场景里降低传感器开销,把传感器和它的目标放到专门的层, 用 mask 缩小每个传感器要考虑的范围。
移动刚体 —— 力与速度
Section titled “移动刚体 —— 力与速度”读 Physics 资源——一个 PhysicsAPI 实例——来驱动刚体。这些方法直接和求解器对话,
所以全部以米计(m/s、m/s²——见单位)。每个方法都取世界实体:
import { defineSystem, Query, Res, RigidBody } from 'esengine';import { Physics } from 'esengine/physics';
const move = defineSystem([Query(RigidBody), Res(Physics)], (q, physics) => { for (const [entity] of q) { physics.applyForce(entity, { x: 0, y: 20 }); // continuous force physics.applyImpulse(entity, { x: 0, y: 5 }); // instant kick (jump) physics.setLinearVelocity(entity, { x: 3, y: 0 }); }});| 方法 | 说明 |
|---|---|
applyForce(e, v) / applyImpulse(e, v) |
持续力 / 瞬时冲量。 |
applyTorque(e, t) / applyAngularImpulse(e, i) |
旋转力 / 冲量。 |
setLinearVelocity(e, v) / getLinearVelocity(e) |
设置 / 读取线速度。 |
setAngularVelocity(e, w) / getAngularVelocity(e) |
设置 / 读取角速度。 |
setGravity(v) / getGravity() |
世界重力。 |
getMass(e) / getInertia(e) / getCenterOfMass(e) / getMassData(e) |
质量属性。 |
setAwake(e, awake) / isAwake(e) |
睡眠刚体控制。 |
getMassData(e) 把质量属性打包成一个 MassData:
MassData 字段 |
类型 | 说明 |
|---|---|---|
mass |
number | 刚体质量(由碰撞体 density × 面积得出)。 |
inertia |
number | 绕质心的转动惯量。 |
centerOfMass |
Vec2 |
质心,在刚体的局部坐标系里,以像素计(× PPU)。 |
查询取像素空间参数,并按当前 PPU 自动缩放。每个都接受一个可选的 maskBits 按层过滤:
// Raycast — every hit along the ray, nearest first.const hits = physics.raycast(origin, direction, 200);for (const hit of hits) {  // hit.entity, hit.point, hit.normal}
const nearby = physics.overlapCircle(center, 64); // Entity[]const inBox = physics.overlapAABB(min, max); // Entity[]const swept = physics.shapeCastCircle(/* … */); // sweep a shape| 方法 | 返回 | 说明 |
|---|---|---|
raycast(origin, dir, dist, maskBits?) |
命中列表 | 射线上所有命中,最近优先。 |
overlapCircle(center, radius, maskBits?) |
Entity[] |
与圆重叠的碰撞体。 |
overlapAABB(min, max, maskBits?) |
Entity[] |
与盒重叠的碰撞体。 |
shapeCastCircle / shapeCastBox / shapeCastCapsule |
命中 | 扫掠一个形状并得到它会撞到什么。 |
各种 cast 都返回 RaycastHit(ShapeCastHit 是同一个形状):
RaycastHit 字段 |
类型 | 说明 |
|---|---|---|
entity |
Entity |
被命中碰撞体所属的实体。 |
point |
Vec2 |
命中点,世界像素。 |
normal |
Vec2 |
命中点处的表面法线(单位向量)。 |
fraction |
number | 命中处占投射距离的比例,0..1——结果按它排序,最近优先。 |
碰撞与传感事件
Section titled “碰撞与传感事件”PhysicsEvents 资源携带这一帧的接触。给碰撞体设 isSensor: true 即可得到 enter/exit 事件
而没有物理响应(触发区):
import { defineSystem, Res } from 'esengine';import { PhysicsEvents } from 'esengine/physics';
const onHit = defineSystem([Res(PhysicsEvents)], (events) => { for (const c of events.collisionEnters) { /* c.entityA, c.entityB, c.normalX/Y, c.contactX/Y */ } for (const x of events.collisionExits) { /* x.entityA, x.entityB */ } for (const h of events.collisionHits) { /* h.approachSpeed, h.pointX/Y, h.normalX/Y */ } for (const s of events.sensorEnters) { /* s.sensorEntity, s.visitorEntity */ } for (const s of events.sensorExits) { /* … */ }});| 事件列表 | 触发时机 |
|---|---|
collisionEnters / collisionExits |
两个实心碰撞体开始 / 停止接触。 |
collisionHits |
高速冲击(携带 approachSpeed)。 |
sensorEnters / sensorExits |
刚体进入 / 离开一个传感碰撞体。 |
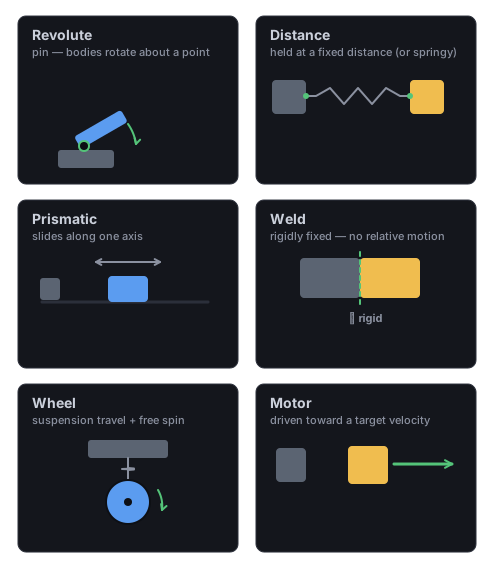
每种关节约束什么:Revolute 铰链(绕销钉转动)、Distance 弹簧/连杆、Prismatic 滑轨(单轴滑动)、刚性 Weld 焊接、Wheel 车轮(悬挂 + 自由旋转),以及 Motor 马达(驱向目标速度)。
连接两个刚体。加一个关节组件(RevoluteJoint、DistanceJoint、PrismaticJoint、
WeldJoint、WheelJoint、MotorJoint),或命令式创建一个并驱动它的马达 / 限位:
// A hinge with a motor (a powered wheel or swinging door).physics.createRevoluteJoint(bodyA, bodyB, anchorA, anchorB, {  enableMotor: true, motorSpeed: 6, maxMotorTorque: 200,  enableLimit: true, lowerAngle: -1.0, upperAngle: 1.0,});
physics.setRevoluteMotorSpeed(bodyA, 10);physics.setRevoluteLimits(bodyA, -0.5, 0.5);const angle = physics.getRevoluteAngle(bodyA);physics.destroyJoint(bodyA);
每种关节都有一套平行的控制方法:
| 关节 | 控制方法 |
|---|---|
| Revolute(铰链) | setRevoluteMotorSpeed、setRevoluteMaxMotorTorque、enableRevoluteMotor、enableRevoluteLimit、setRevoluteLimits、getRevoluteAngle、getRevoluteMotorTorque。 |
| Distance(弹簧) | setDistanceJointLength、getDistanceJoint*Length、enableDistanceJointSpring/Limit/Motor、setDistanceJointLimits、setDistanceJointMotorSpeed…… |
| Prismatic(滑轨) | getPrismaticJointTranslation/Speed、enablePrismaticJointSpring/Limit/Motor、setPrismaticJointLimits/MotorSpeed/MaxMotorForce…… |
| Wheel(车轮) | enableWheelJointSpring/Limit/Motor、setWheelJointLimits/MotorSpeed/MaxMotorTorque、getWheelJointMotorTorque。 |
| Motor(马达) | setMotorJointLinearVelocity、setMotorJointAngularVelocity、setMotorJointMaxVelocityForce、setMotorJointMaxVelocityTorque。 |
用 destroyJoint(bodyA) 销毁任何关节。
马达关节驱动刚体 B 相对刚体 A 达到目标速度(或弹簧保持的偏移)——传送带、动力平台, 或任何要靠自身动力移动的东西:
// 传送带:把箱子沿 +x 匀速驱动。world.insert(crate, MotorJoint, { connectedEntity: anchor, linearVelocity: { x: 200, y: 0 }, // 世界像素/秒 maxVelocityForce: 500, // 可用于达到该速度的力(牛顿)});physics.setMotorJointLinearVelocity(crate, { x: -200, y: 0 }); // 运行时反向场景创作的关节会在视口画出 gizmo:两个锚点之间的虚线连线,锚点圆点可以拖拽——
拖动即写入 anchorA / anchorB(各自刚体的局部坐标)。棱柱/轮式关节还会画出滑动轴,
拖它的端点即可重新指向;马达关节沿目标线速度画出箭头。整个家族(碰撞体、单向箭头、
关节)由视口显示标记里的物理项统一开关。
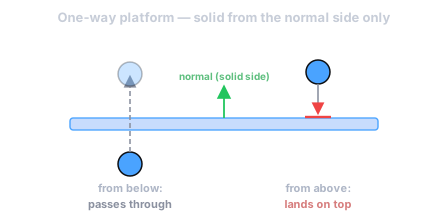
给静态(或运动学)碰撞体加 OneWayPlatform,使其单面——刚体从一个方向落上去、从其它
方向穿过。这就是经典的“从下往上跳穿平台”行为,建在 Box2D 的 pre-solve 回调上(没有单向平台时
零开销):
import { OneWayPlatform } from 'esengine/physics';
world.spawn(  Transform, { position: { x: 0, y: 0 } },  RigidBody, { bodyType: BodyType.Static },  BoxCollider, { halfExtents: { x: 2, y: 0.2 } },  OneWayPlatform, { normal: { x: 0, y: 1 } }, // 实心顶面:从上落下、从下穿过);
normal 是世界空间里的实心侧方向;{ x: 0, y: 1 }(默认)= “实心顶面”。设 enabled: false
让平台恢复为普通实心体。在编辑器里,单向平台的碰撞体 gizmo 会沿实心侧法线多画一支箭头,
朝向一眼可辨。
鼠标 / 拖拽关节
Section titled “鼠标 / 拖拽关节”想让玩家用指针拖动刚体,用拖拽关节 API。Box2D v3 没有专门的鼠标关节,这是它的官方替代——一根 把刚体拉向移动目标的弹簧。指针按下时创建(在光标处抓住刚体)、移动时更新目标、抬起时销毁:
// 指针按下——在世界光标处抓住刚体:physics.createMouseJoint(entity, cursorWorld); // maxForce 按刚体自动取值// 指针移动:physics.setMouseTarget(cursorWorld);// 指针抬起:physics.destroyMouseJoint();同一时刻只有一个拖拽在生效。传 { hertz, dampingRatio, maxForce } 调弹簧的刚度与抓力。
想让玩家沿着表面行走、而不是像动态刚体那样翻滚,加一个 CharacterController。每步从玩法设它
的 velocity;控制器用 Box2D 的原生运动学 mover(b2World_CollideMover +
b2SolvePlanes)推进一步——把身体碰撞成接触平面,再解出一次去穿插的滑动,所以贴地的角色能
干净地移动和起跳,而不是粘在地面上。它把结果写回,并报告碰到了什么:
import { defineSystem, Query, Mut, CharacterController } from 'esengine';
const drive = defineSystem([Query(Mut(CharacterController))], (q) => {  for (const [entity, cc] of q) {    cc.velocity = { x: input.moveX * 240, y: cc.velocity.y - 900 * dt };  // gravity    if (cc.isOnFloor && jumpPressed) cc.velocity.y = 480;  }});
给实体加一个碰撞体(mover 形状由它推导——盒子会内接成沿长轴的胶囊);若希望别的刚体能撞到角色,
再加一个运动学(Kinematic) RigidBody。mover 会自动排除角色自身的刚体,所以它的 maskBits
不必刻意避开自身的碰撞层。用固定步长的系统驱动 velocity 让运动与帧率无关;跳跃读 isOnFloor
边沿(会正确投递到 FixedUpdate——见 输入)。
| 属性 | 类型 | 默认 | 说明 |
|---|---|---|---|
velocity |
Vec2 | {0, 0} |
期望速度(世界像素/秒,每步设置)。 |
up |
Vec2 | {0, 1} |
用于地面/天花板分类的上方向。 |
floorMaxAngle |
number | 0.785 |
相对 up 的最大可行走坡度,弧度(45°)。 |
skinWidth |
number | 1 |
与表面保持的间隙(像素),避免贴壁抖动。 |
maxSlides |
number | 4 |
每次移动的最大脱离滑动迭代次数(下限为 1)。 |
snapLength |
number | 0 |
向下探测长度(像素),把角色吸附在下行的台阶/斜坡上;0 表示关闭。上升时跳过,所以跳跃仍能离地。 |
slideOnCeiling |
boolean | true |
为 false 时,撞到天花板会取消向上速度,而不是沿其滑动。 |
maskBits |
number | 0xFFFF |
阻挡角色的层。 |
isOnFloor / isOnWall / isOnCeiling |
boolean | — | 输出:这次移动碰到了什么。 |
floorNormal |
Vec2 | — | 输出:最后接触地面的法线。 |
realVelocity |
Vec2 | — | 输出:碰撞后的实际位移 / dt。 |
物理插件会安装一个 PhysicsDebugDraw 资源——一个游戏内叠加层,通过
Draw API 描出碰撞体轮廓、速度向量和接触点。
它默认关闭;在任何系统里翻转 enabled,就能看见求解器眼中的世界:
import { defineSystem, Res, Input } from 'esengine';import { PhysicsDebugDraw } from 'esengine/physics';
const toggleDebug = defineSystem([Res(Input), Res(PhysicsDebugDraw)], (input, dbg) => {  if (input.isKeyPressed('F1')) dbg.enabled = !dbg.enabled;});
PhysicsDebugDrawConfig 字段 |
默认 | 绘制内容 |
|---|---|---|
enabled |
false |
整个叠加层的总开关。 |
showColliders |
true |
碰撞体轮廓,按刚体类型着色:蓝 = 静态,绿 = 动态,青 = 运动学;传感器为黄色。 |
showVelocity |
false |
每个动态刚体沿线速度画一支红色箭头。 |
showContacts |
false |
本帧新开始的每个接触点画一个红点。 |
叠加层在每个刚体的实时变换处以世界像素绘制(按当前 PPU 缩放),你看到的正是查询
认定的碰撞体位置。setupPhysicsDebugDraw(app, Physics, PhysicsEvents) 就是
PhysicsPlugin 替你跑的接线——插入该资源并注册绘制回调;只有在绕开插件的自定义宿主里,
才需要自己调它(或每帧调底层的 drawPhysicsDebug(app, Physics, PhysicsEvents))。
- 固定时间步:每帧施加持续力、读
PhysicsEvents,因为物理独立于帧 delta 做子步。 - 快速细小刚体(子弹、薄平台)用
bullet: true防穿透。 - 角色用
fixedRotation: true免得翻倒。 - 碰撞体与求解器用米,查询和角色控制器用像素——混用是最常见的 bug;用
physics.getPixelsPerUnit()换算(见单位)。 - 触发器用传感器:
isSensor: true给出 enter/exit 事件而无物理推挤。 - 用层过滤(
categoryBits/maskBits),而不是在事件处理里判断实体类型。